Parameters
Presets
Presets contain a snapshot of your effect configuration. 146 built-in presets are available.
When you save parameter configuration to a file on disk, this file can later be loaded to recreate the same effect configuration. Presets generated in one video application can be used by the same plug-in running in a different video application.
How do I use the presets browser?Images
Images
Lets you configure a list of image files.
Click the button to populate the list through a configuration window. The window allows you to add, remove and rearrange image files. The effect processes your files in the same order in which they appear in the list.
The configuration window also provides shortcuts to edit each file using a separate application or reveal its location in the Finder. If a file is reported as missing, as when its path on disk has changed, click the button to specify its new location.
Attributes available for each image file
Image (secs)
Set to 1 by default. Only values between 0 and 60 are allowed.
This parameter defines how many seconds each image remains visible before the transition to the next image begins.
The same duration is used for all images, but you can override this behavior via the configuration window.
Image: Geometry
Parameters in this group let you control the initial location, scale, and angle for each image, and allow you to enable Pan and Zoom animations and randomized geometry to create engaging animations, automatically.
Image: Geometry
Presets
Presets saved and applied through this parameter affect only to parameters within the Image: Geometry group. 22 built-in presets are available.
How do I use the presets popup menu?Scale To
The following options are available:
Scale
Set to 0.75 by default. Only values between 0 and 2 are allowed.
This is the default scale factor for every image in the sequence. You can customize the scale on a per-image bases through the configuration window.
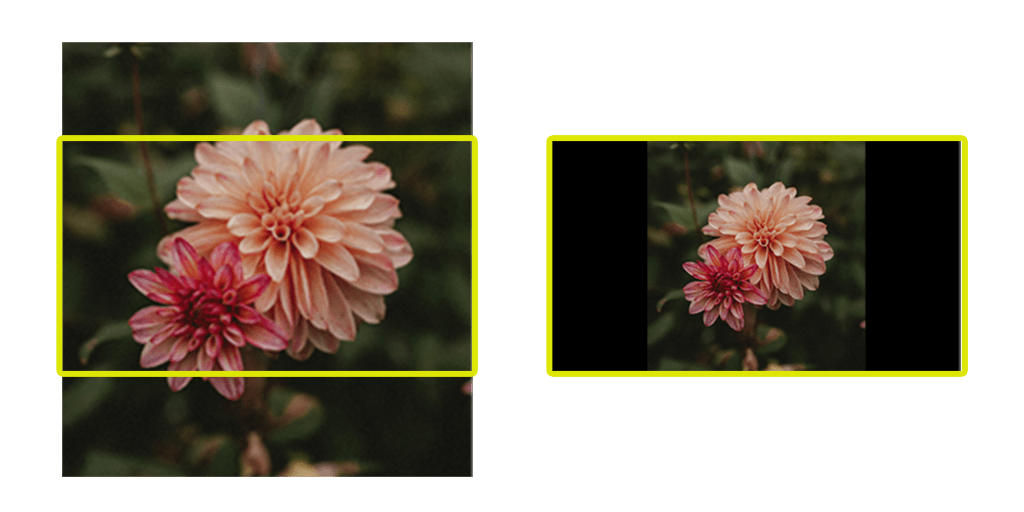
A value of 1.0 means that the image is scaled to have the same dimensions of the frame. The Scale To parameter also affects the scale factor, since images do not necessarily share the same aspect ratio of your timeline.
For example, when this parameter is set to 1.0 and the Scale To parameter is set to Fill, the image is scaled so as to cover the entire frame, but some of its content may be cropped.
When the value is 1.0 and the Scale To parameter is set to Fit, some pillarboxing or letterboxing may occur:
Please note that other parameters in this group also affect the dimensions of each image. Automatic Pan and Zoom and randomized geometry alter the location, angle and scale of each image as part of their animation.
Position
A point parameter centered in the frame by default.
How do I adjust the location on-screen?
Rotation
Angle set to 0° by default.
Value must be between 0° and 0°.
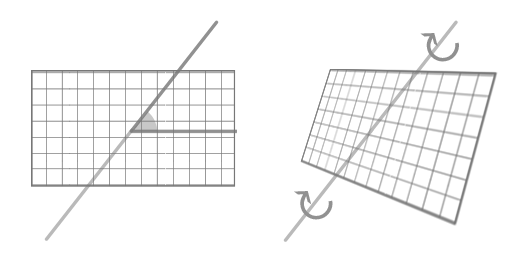
3D Axis
Angle set to 0° by default.
Defines an axis on the 2D plane used as the basis for a rotation in 3D space.
Images are rotated in 3D space according to this 3D Axis and 3D Angle parameters. For example, when this parameter is set to 0˚ and 3D Angle is set to 45˚, the result is a 3D rotation of 45˚ around the X axis.
This particular way to represent 3D rotations is more suitable to automatic animations. When image geometry is randomized, the 3D Axis is chosen at random between 0˚ and 360˚, while the rotation can be controlled by picking 3D Angle values within a certain range.
This parameter is not available when Randomize is on. In that case, a random angle is chosen over the entire possible range.
As for all randomized aspects of the output, you can force a new set of choices by assigning a new Seed parameter value under the Advanced group.
3D Angle
Set to 0° by default.
Pan and Zoom
Zoom
The following options are available:
Amount
Set to 50% by default.
Randomize and Animate
Randomize
On by default.
As for all randomized aspects of the output, you can force a new set of choices by assigning a new Seed parameter value under the Advanced group.
Randomize 3D Axis
Off by default.
Min Scale Change
Set to -0.05 by default. Only values between -1 and 1 are allowed.
This is the lower bound for random changes to the value of the Scale parameter.
A value of -0.1 means that each image will at most be scaled down by 10%, relative to the frame size.
Max Scale Change
Set to 0.05 by default. Only values between -1 and 1 are allowed.
This is the upper bound for random changes to the value of the Scale parameter.
A value of 0.1 means that each image will at most be scaled up by 10%, relative to the frame size.
Min X Change
Set to -0.02 by default. Only values between -1 and 1 are allowed.
This is the lower bound for random changes to the X coordinate of the Position parameter.
A value of -0.02 means that each image may be moved left at random by no more than 2% of the overall size of the frame.
Max X Change
Set to 0.02 by default. Only values between -1 and 1 are allowed.
This is the upper bound for random changes to the X coordinate of the Position parameter.
A value of 0.02 means that each image may be moved right at random by no more than 2% of the overall size of the frame.
Min Y Change
Set to -0.01 by default. Only values between -1 and 1 are allowed.
This is the lower bound for random changes to the Y coordinate of the Position parameter.
A value of -0.02 means that each image may be moved down at random by no more than 2% of the overall size of the frame.
Max Y Change
Set to 0.01 by default. Only values between -1 and 1 are allowed.
This is the upper bound for random changes to the Y coordinate of the Position parameter.
A value of 0.02 means that each image may be moved down at random by no more than 2% of the overall size of the frame.
Min Rotation Change
Angle set to -5° by default.
Value must be between 0° and 0°.
This is the lower bound for random changes to the value of the Rotation parameter.
A value of -5 means that each image may be rotated clockwise at random by no more than 5 degrees.
Max Rotation Change
Angle set to 5° by default.
Value must be between 0° and 0°.
This is the upper bound for random changes to the value of the Rotation parameter.
A value of 5 means that each image may be rotated counter-clockwise at random by no more than 5 degrees.
Min 3D Angle Change
Set to -5° by default.
Max 3D Angle Change
Set to -25° by default.
Animate Scale
On by default.
When enabled, image scale animates from its assigned value to its randomized value.
Since the animation progresses to or from a randomized scale, this option is only available when Randomize is on.
Animate Rotation
On by default.
When enabled, the image angle animates from its assigned value to its randomized value.
Since the animation progresses to or from a randomized angle, this option is only available when Randomize is on.
Animate 3D Angle
On by default.
Animate X
On by default.
When enabled, the X coordinate of each image animates from its assigned value to its randomized value.
Since the animation progresses to or from a randomized coordinate, this option is only available when Randomize is on.
Animate Y
On by default.
When enabled, the Y coordinate of each image animates from its assigned value to its randomized value.
Since the animation progresses to or from a randomized coordinate, this option is only available when Randomize is on.
Animate When?
The following options are available:
Animate How?
Geometry is animated by interpolating between two sets of values: the fixed values defined by the Scale, Angle and Position parameters, and the values picked at random by the plug-in.
This parameter lets you decide whether geometry is animated from fixed to random geometry, or viceversa.
Keep in mind that geometry may also be simultaneously affected by a pan and zoom effect, as decided by the Zoom parameter.
The following options are available:
Easing
The following options are available:
- Linear

- Ease in

- Ease out

- Ease in/out — initial selection

Image: Border and Vignette
Parameters in this group let you add and customize borders.
There are complex interactions between various parameters. A border will be visible when:
- Uniform Border is on and you assign a non-zero Border parameter value.
- Uniform Border is off and you assign a non-zero border to at least one of the four edges of the image.
- Border Fade is set to a value higher than 0%. As colors fade towards the edges, they reveal a border.
When a border is visible, its color is determined by the Border Fill parameter. When the Adaptive Color option is chosen, the border color is computed for each image by analyzing its content and finding its average tint. You can then lighten or darken this tint through the Adaptive Brightness parameter. You should also be aware of subtle differences between Border Fade and Vignette. Fading colors reveals your current border color, whereas a vignette always darkens edges of your photograph. Fading and vignetting can be combined to simulate a number of print or lens-based techniques.
Image: Border and Vignette
Parameters in this group let you add and customize borders.
There are complex interactions between various parameters. A border will be visible when:
- Uniform Border is on and you assign a non-zero Border parameter value.
- Uniform Border is off and you assign a non-zero border to at least one of the four edges of the image.
- Border Fade is set to a value higher than 0%. As colors fade towards the edges, they reveal a border.
You should also be aware of subtle differences between Border Fade and Vignette. Fading colors reveals your current border color, whereas a vignette always darkens edges of your photograph. Fading and vignetting can be combined to simulate a number of print or lens-based techniques.
Uniform Border
On by default.
Border
Set to 3% by default.
Left Border
Set to 0% by default.
Controls the thickness of the border on the left edge of each image.
This parameter is only available when Uniform Border is off.
Right Border
Set to 0% by default.
Controls the thickness of the border on the right edge of each image.
This parameter is only available when Uniform Border is off.
Top Border
Set to 0% by default.
Controls the thickness of the border on the top edge of each image.
This parameter is only available when Uniform Border is off.
Bottom Border
Set to 0% by default.
Controls the thickness of the border on the bottom edge of each image.
This parameter is only available when Uniform Border is off.
Border Sizing
Controls whether the percentage you specify borders in expresses a dimension that is relative to the output of the plug-in (the video frame) or relative to the size of the image.
This behavior affects border sizing whether or not Uniform Border is enabled.
For example, if you wish to create a border on the left edge of each image that covers half of the image, you would select Relative to image and specify a Left Border of 50%
The following options are available:
Rounded Corners
Set to 0% by default.
Border Aging
Set to 0% by default.
This parameter lets you simulate the effect of aging along the borders of each image. A higher value increases the amount of degradation around the edges.

The simulated aging process guarantees different results for each image. Border aging works great in combination with certain color adjustments, such as Sepia tone, available through the Effect parameter under the Image::Effects group.
Aging
The following options are available:
Smooth Contour
Set to 0% by default.
Border Fade
Set to 0% by default.
Controls whether the image fades out towards the edges. This effect can be used to simulate aging, or to simulate printing techniques from the early days of photography.
This effect should not be confused with vignetting, which artificially controls how dark the edges appear compared to the center of the image.
Border Fill
The following options are available:
Border Color
Adaptive Brightness
Set to 85% by default.
Controls the overall brightness of the adaptive border color.
While the Border Fill parameter allows you to enable the computation of an adaptive color, this parameter allows you to controls its brightness.
Border Opacity
Set to 100% by default.
Border Blend Mode
The following options are available:
Vignette
Off by default.
Vignette Intensity
Set to 50% by default.
Vignette Contrast
Set to 50% by default.
Controls the softness of the areas affected by the color adjustment when Vignette is on.
Less contrast provides a more gradual shift from the original image colors to the darkened areas on the edges.
Image: Effects
Parameters in this group let you apply artistic effects and color adjustments to all images in the animation.
Image: Effects
Effect
Controls whether any particular effect is applied to all images in the sequence, or whether one of the built-in effects is chosen at random.
When choosing at random, you can control which effects to choose from by enabling the corresponding option.
The following options are available:
Saturate
Saturate
Intensity
Set to 100% by default.
Desaturate
Desaturate
Intensity
Set to 100% by default.
Boost Warm
Boost Warm
Intensity
Set to 100% by default.
Boost Cool
Boost Cool
Intensity
Set to 100% by default.
Black and White
Black and White
Balance
Set to 100% by default.
Intensity
Set to 100% by default.
When the Black and White effect is applied to an image, this parameter controls the intensity of the effect.
When set to 100%, all original color information is lost, and the output is purely black and white.
Sepia
Sepia
Intensity
Set to 100% by default.
When the Sepia effect is applied to an image, this parameter controls the intensity of the effect.
When set to 100%, all original color information is lost, and the output is purely in sepia tone.
Duotone
Duotone
Duotone Color 1
Duotone Color 2
Duotone Balance
Set to 50% by default.
Duotone Sharpness
Set to 50% by default.
Duotone Mix
Set to 50% by default.
When the Vibrant effect is applied to an image, this parameter controls the overall intensity of the effect.
When set to 100%, all original color information is replaced by the output of the duotone color adjustment.
Vibrant
Vibrant
Intensity
Set to 100% by default.
When the Vibrant effect is applied to an image, this parameter controls the intensity of the effect.
Vibrancy is a process that only boosts color saturation for pixels that have muted colors to start with.
Vintage
Vintage
Intensity
Set to 100% by default.
Halftone
Halftone
Halftone Process
The following options are available:
Halftone Size
Set to 15% by default.
Halftone Angle
Set to 30° by default.
Value must be between 0° and 0°.
Halftone Mix
Set to 50% by default.
Controls the intensity of the current Halftone Process.
When set to 100%, all original color information is replaced by the halftone pattern.
Image: Drop Shadow
Parameters in this group let you add and customize drop shadows.
Image: Drop Shadow
Drop Shadow
On by default.
Drop Shadow X
Set to 0 by default. Only values between -1 and 1 are allowed.
Drop Shadow Y
Set to -0.25 by default. Only values between -1 and 1 are allowed.
Drop Shadow Radius
Set to 50% by default.
Drop Shadow Color
Transitions
Build In
On by default.
When enabled, the photo sequence animation begins by transitioning from a transparent frame to the first image in the sequence.
When turned off, the animation starts immediately by displaying the first image in the sequence.
Transition (secs)
Set to 1 by default. Only values between 0 and 60 are allowed.
This parameter defines how many seconds the transition between one image and next lasts.
Unlike the Image (secs) parameter, transition duration cannot be customized on a per-image basis. For visual consistency, a single duration is used for all transitions.
Transition Easing
The following options are available:
- Linear
- Ease in
- Ease out
- Ease in/out — initial selection
Transition
The following options are available:
Transition: Randomizer
Parameters in this group determine which transitions may be chosen at random by the photo sequence animation.
Transition: Randomizer
Accordion
Blocks Dissolve
Camera Flash
Channel Switch
Copy Machine
Cross Dissolve
Cube
Defocus Dissolve
Defocus Wipe
Doorway
Fade to Color
Off by default.
Filmic Dissolve
Flip
Genie
Glow Dissolve
Halftone Wipe
Jump Cut
Mod
Origami
Pixelate Dissolve
Pixelate Wipe
Push
Radial Wipe
Scatter Wipe
Slice
Whoosh
Zoom
Transition: Accordion
A 3D transition that folds one image to move it off screen and unfolds a new image as it moves on screen.
Transition: Accordion
Presets
Presets saved and applied through this parameter affect only to parameters within the Transition: Accordion group. While no built-in presets are available through this parameter, you can still save and load your own preset files.
How do I use the presets popup menu?Folds
Set to 5 by default.
The slider is limited to values between 0 and 50 but you can type values between 1 and 50 by clicking on the current value in the inspector.
Direction
The following options are available:
Animate Direction
The following options are available:
Gap
Set to 0% by default.
Shadows
Set to 25% by default.
Fold Outgoing
Set to 75% by default.
Unfold Incoming
Set to 75% by default.
Transition: Blocks Dissolve
Random, square regions of one image animate to reveal the next.
Transition: Blocks Dissolve
Scale
Set to 10% by default.
Speed
Set to 25% by default.
Transition: Camera Flash
A transition that simulates the effect of a camera flash, whose intense light momentarily floods the scene. The transition is timed to fade from one image to the next in synch with the camera flash.
Transition: Camera Flash
Target
The following options are available:
Overexposure
Set to 50% by default.
Glow
Set to 50% by default.
Transition: Channel Switch
A transition that simulates the effect of switching channels on an old CRT television based on analog transmission, complete with distortions, chromatic aberrations and scanlines.
Transition: Channel Switch
Presets
Presets saved and applied through this parameter affect only to parameters within the Transition: Channel Switch group. 1 built-in presets are available.
How do I use the presets popup menu?Dissolve Speed
Set to 50% by default.
Dissolve Over Black
On by default.
When enabled, the images are progressively composited over a black background as the transition progresses.
This option allows for the output to more closely resemble the look of an old TV set, but it also implies that any background behind the images will be hidden during the transition.
Amount
Set to 25% by default.
Randomize Amount
Set to 25% by default.
Smoothness
Set to 95% by default.
Randomize Smoothness
Set to 0% by default.
Slide
Set to 0.25 by default. Only values between -1 and 1 are allowed.
Controls the direction in which the distortion pattern moves vertically.
Negative values cause the pattern to slide up, positive values cause the pattern to slide down.
Randomize Slide
Set to 25% by default.
Waviness
Set to 100% by default.
Randomize Waviness
Set to 25% by default.
Brightness
Set to -0.5 by default. Only values between -1 and 1 are allowed.
Controls the brightness adjustment applied to the image as the transition reaches its peak.
Negative values mean that the images are darkened during the transition. Positive values cause the images to brighten.
Randomize Brightness
Set to 0% by default.
Saturation
Set to -1 by default. Only values between -1 and 1 are allowed.
Controls the saturation adjustment applied to the image as the transition reaches its peak.
Negative values mean that colors are desaturated during the transition. Positive values cause colors to become saturated.
Randomize Saturation
Set to 0% by default.
Chroma
Set to 10% by default.
Randomize Chroma
Set to 0% by default.
Sync Lines
Controls the visibility of extra signal information around the frame.
Under normal circumstances an old TV set based on analog transmission would not display this information. The extra content was designed to help the set synch the image vertically and horizontally, deliver captions, etc.
V-Sync Min
Set to 1 by default. Only values between -5 and 5 are allowed.
Minimum amount by which the image will lose vertical synch during the transition.
A value of 1.0 means that the image will lose vertical synch by at least one full height of the frame.
When the Allow Snapback parameter is enabled, vertical sync may also be lost for non-multiples of the frame height. For example, if the randomization causes V-Sync to be lost by 1.5, the image will slide up one and a half times before snapping back to its correct, synched position.
V-Sync Max
Set to 3 by default. Only values between -5 and 5 are allowed.
Maximum amount by which the image will lose vertical synch during the transition.
A value of 3.0 means that the image can lose vertical synch by up to 3 full heights of the frame.
H-Sync Min
Set to 0 by default. Only values between -5 and 5 are allowed.
Minimum amount by which the image will lose horizontal synch during the transition.
A value of 1.0 means that the image will lose horizontal synch by at least one full width of the frame.
When the Allow Snapback parameter is enabled, horizontal sync may also be lost for non-multiples of the frame width. For example, if the randomization causes H-Sync to be lost by 1.5, the image will slide sideways one and a half times before snapping back to its correct, synched position.
H-Sync Max
Set to 0 by default. Only values between -5 and 5 are allowed.
Maximum amount by which the image will lose horizontal synch during the transition.
A value of 3.0 means that the image can lose horizontal synch by up to 3 full heights of the frame.
Allow Snapback
On by default.
Noise Amount
Set to 50% by default.
Randomize Noise
Set to 50% by default.
Grayscale Noise
On by default.
Scanline Height
Set to 3 by default. Only values between 1 and 10 are allowed.
Scanline Contrast
Set to 75% by default.
Controls the contrast of the simulated scanlines.
This parameter has noticeable side effects only for higher values of the Scanline Height parameter
Transition: Copy Machine
A light sweeps across one image to reveal the next image, to simulate the action of an old photocopier scanning its surface.
Transition: Copy Machine
Presets
Presets saved and applied through this parameter affect only to parameters within the Transition: Copy Machine group. While no built-in presets are available through this parameter, you can still save and load your own preset files.
How do I use the presets popup menu?Color
Size
Set to 25% by default.
Start Direction
Controls if and how the direction of the transition changes with each use.
- Constant: the wipe always starts along the same direction, specified by the Angle parameter.
- Increase: on its first use, the wipe starts in the direction specified by the Angle parameter. On subsequent uses, the angle is increased by the amount specified by the Increment parameter.
- Flip: on its first use, the wipe starts in the direction specified by the Angle parameter. On subsequent uses, the angle is flipped to the opposite direction.
- Randomize: the wipe transition starts in a random direction at every use.
Please note that the transition may change direction as it progresses. This behavior is controlled by the End Direction parameter.
Angle
Set to 0° by default.
The initial direction of the transition, on its first use.
The direction may change on subsequent uses, a behavior controlled by the Start Direction parameter. The transition may also shift direction as it progresses, a behavior controlled by the End Direction parameter.
Increment
Angle set to 90° by default.
End Direction
Controls the final direction of the transition.
- Same as start: the direction does not change as the transition progresses.
- Offset from start: the direction changes as the transition progresses by the the amount specified by the Offset parameter.
- Randomize: the direction changes by a random amount.
As for all randomized aspects of the output, you can force a new set of choices by assigning a new Seed parameter value under the Advanced group.
Offset
Angle set to 60° by default.
Flip Offset
On by default.
On its first use, the transition will only offset the direction by the value of the Offset parameter. When this option is enabled, the offset will be flipped on all subsequent uses.
For example, if the Offset parameter is set to 45˚, on its next use the transition will use an offset of -45˚, and keep alternating between these two values indefinitely.
This parameter is only available when End Direction is set to Offset.
Transition: Cube
One image is projected onto a 3D cube, which is rotated to reveal the next image on the adjacent face.
Transition: Cube
Presets
Presets saved and applied through this parameter affect only to parameters within the Transition: Cube group. While no built-in presets are available through this parameter, you can still save and load your own preset files.
How do I use the presets popup menu?Side
The following options are available:
Reveal
The following options are available:
Zoom
Set to -0.1 by default. Only values between -1 and 1 are allowed.
Rotation
The following options are available:
Direction
The following options are available:
Angle
Set to 30° by default.
Value must be between 0° and 0°.
The maximum angle of tilt reached by the transition.
This parameter is only available when Rotation is set to Round-trip to given angle.
Increment
Angle set to 90° by default.
Rotations
Set to 1 by default. Only values between 1 and 10 are allowed.
Number of full rotations about the Z axis the cube completes during the transition.
This parameter is only available when Rotation is set to Complete a full rotation.
Direction
The following options are available:
Transition: Defocus Dissolve
Random, square regions of one image animate to reveal the next.
Transition: Defocus Dissolve
Type
The following options are available:
Blur
Set to 50% by default.
Overexposure
Set to 25% by default.
Direction
The following options are available:
Angle
Set to 0° by default.
Value must be between 0° and 0°.
Increment
Angle set to 90° by default.
Transition: Defocus Wipe
A classic wipe transition that combines a blur with chromatic aberration to reveal the next image.
Transition: Defocus Wipe
Presets
Presets saved and applied through this parameter affect only to parameters within the Transition: Defocus Wipe group. While no built-in presets are available through this parameter, you can still save and load your own preset files.
How do I use the presets popup menu?Wipe
Size
Set to 25% by default.
Feather
Set to 100% by default.
Start Direction
Controls if and how the direction of the transition changes with each use.
- Constant: the wipe always starts along the same direction, specified by the Angle parameter.
- Increase: on its first use, the wipe starts in the direction specified by the Angle parameter. On subsequent uses, the angle is increased by the amount specified by the Increment parameter.
- Flip: on its first use, the wipe starts in the direction specified by the Angle parameter. On subsequent uses, the angle is flipped to the opposite direction.
- Randomize: the wipe transition starts in a random direction at every use.
Please note that the transition may change direction as it progresses. This behavior is controlled by the End Direction parameter.
Angle
Set to 0° by default.
The initial direction of the transition, on its first use.
The direction may change on subsequent uses, a behavior controlled by the Start Direction parameter. The transition may also shift direction as it progresses, a behavior controlled by the End Direction parameter.
Increment
Angle set to 90° by default.
End Direction
Controls the final direction of the transition.
- Same as start: the direction does not change as the transition progresses.
- Offset from start: the direction changes as the transition progresses by the the amount specified by the Offset parameter.
- Randomize: the direction changes by a random amount.
As for all randomized aspects of the output, you can force a new set of choices by assigning a new Seed parameter value under the Advanced group.
Offset
Angle set to 60° by default.
Flip Offset
On by default.
On its first use, the transition will only offset the direction by the value of the Offset parameter. When this option is enabled, the offset will be flipped on all subsequent uses.
For example, if the Offset parameter is set to 45˚, on its next use the transition will use an offset of -45˚, and keep alternating between these two values indefinitely.
This parameter is only available when End Direction is set to Offset.
Defocus
Type
The following options are available:
Blur
Set to 25% by default.
Split Channels
Controls which channels are shifted to simulate chromatic aberration.
- Red and green: Offset the red and green channels while leaving the blue channel untouched.
- Red and blue: Offset the red and blue channels while leaving the green channel untouched.
- Green and blue: Offset the green and green channels while leaving the red channel untouched.
Split Amount
Set to 0.5 by default. Only values between -1 and 1 are allowed.
Transition: Doorway
A 3D transition that splits and opens one image to reveal the next, as if by moving the object closer to the viewer and having it come to focus.
Transition: Doorway
Presets
Presets saved and applied through this parameter affect only to parameters within the Transition: Doorway group. While no built-in presets are available through this parameter, you can still save and load your own preset files.
How do I use the presets popup menu?Action
The following options are available:
Orientation
The following options are available:
Reflections
Off by default.
Panel
The following options are available:
Clearance
Set to 75% by default.
Controls the amount of space that separates each panel as it swings.
This amount is specified relative to the dimensions of the frame.
Start opacity
Set to 0% by default.
Start scale
Set to 20% by default.
Angle
Set to 0° by default.
Value must be between 0° and 0°.
Angle Animation
The following options are available:
Min Angle
Set to -90° by default.
Value must be between 0° and 0°.
Defines the lower bound of the range the random angle can be choosed from.
This parameter is only available when Angle Animation is set to Randomize.
Max Angle
Set to 90° by default.
Value must be between 0° and 0°.
Defines the upper bound of the range the random angle can be choosed from.
This parameter is only available when Angle Animation is set to Randomize.
Type
The following options are available:
Blur
Set to 20% by default.
Controls how out-of-focus the next image should be when the transition begins.
As the transition progresses, the image is brought into focus.
Transition: Fade to Color
A transition that fades the current image to the given color, revealing the next image by fading it in.
Transition: Fade to Color
Color
The outgoing image fades to this color, while the incoming image fades in from the same color.
The opacity allows you to control the visibility of the background.
Hold
Set to 50% by default.
Midpoint
Set to 0.5 by default.
The slider is limited to values between 0 and 1 but you can type values between -∞ and +∞ by clicking on the current value in the inspector.
Transition: Filmic Dissolve
A variant of the cross dissolve transition that favors bright or dim colors in the process of fading from one image to the next. The artistic intent behind this process is to cause certain color ranges to be linger in the output longer than others.
Transition: Filmic Dissolve
Fade
The following options are available:
Select
The following options are available:
Luminance
Set to 0% by default.
Allows you to select which pixels should be dissolved first by specifying their brightness. The range is further defined be Softness parameter.
Available only when Select is set to Custom Luminance.
Softness
Set to 25% by default.
Allows you to widen the range of pixels that should be dissolved first. The location of the range is defined by the Luminance parameter.
Available only when Select is set to Custom Luminance.
Transition: Flip
A 3D transition that flips one image to reveal the next, on the other side.
Transition: Flip
Direction
The following options are available:
Start Direction
Initial direction in which the current image is flipped to reveal the next.
The actual direction used by the transition is a dependent on the Direction parameter too, since it allows for changes to the direction over time.
The following options are available:
Light Attenuation
Set to 50% by default.
Scale
Set to 50% by default.
Controls the minimum scale reached by the image as it flips.
Scaling the image down simulates the effect of moving the image away from the viewer, in 3D space.
Transition: Genie
A transition that squeezes and moves images in and out of the frame, an effect which closely resembles the animation of a window being minimized on the computer screen.
Transition: Genie
Presets
Presets saved and applied through this parameter affect only to parameters within the Transition: Genie group. While no built-in presets are available through this parameter, you can still save and load your own preset files.
How do I use the presets popup menu?Overlap animations
Set to 50% by default.
Squeeze Start
Set to 10% by default.
Controls the point in time when the image begins to be squeeze, relative to the overall progress of the animation.
Increase this value to delay the moment when the squeeze distortion is applied.
Squeeze Amount
Set to 85% by default.
Offscreen Direction
The following options are available:
Angle
Set to 0° by default.
Increment
Angle set to 90° by default.
Angle that the direction in which the current image disappears should increment at each use of the transition.
This parameter is only available when Offscreen Direction is set to Increase.
Onscreen Direction
The following options are available:
Offset
Angle set to 60° by default.
Flip Offset
On by default.
On its first use, the transition will only offset the direction of the outgoing image by the angle specified by the Offset parameter. When this option is enabled, the offset will be flipped on all subsequent uses.
For example, if the Offset parameter is set to 45˚, on its next use the transition will use an offset of -45˚, and keep alternating between these two values indefinitely.
This parameter is only available when Onscreen Direction is set to Offset.
Transition: Glow Dissolve
A transition that applies a glow effect to one image and dissolves to the next as the effect peaks.
Transition: Glow Dissolve
Presets
Presets saved and applied through this parameter affect only to parameters within the Transition: Glow Dissolve group. While no built-in presets are available through this parameter, you can still save and load your own preset files.
How do I use the presets popup menu?Source
The following options are available:
Custom Luminance
Set to 90% by default.
Pixels that match this luminance value emit light as part of the effect.
A value of 0% matches black, a value of 100% matches white.
This parameter is only available when Source is set to Custom Luminance.
Colors
The following options are available:
Bright Color
Dark Color
Type
The following options are available:
Glow
Set to 5% by default.
Overexposure
Set to 50% by default.
Split Channels
Controls which channels are shifted to simulate chromatic aberration.
- Red and green: Offset the red and green channels while leaving the blue channel untouched.
- Red and blue: Offset the red and blue channels while leaving the green channel untouched.
- Green and blue: Offset the green and green channels while leaving the red channel untouched.
The following options are available:
Split Amount
Set to 0.1 by default. Only values between -1 and 1 are allowed.
Split Angle
Set to 0° by default.
Transition: Halftone Wipe
Our most advanced take on a wipe transition that combines popular halftone techniques with a wipe. Both the process and the animation can be randomized to provide a different look each time the transition is applied.
Transition: Halftone Wipe
Presets
Presets saved and applied through this parameter affect only to parameters within the Transition: Halftone Wipe group. While no built-in presets are available through this parameter, you can still save and load your own preset files.
How do I use the presets popup menu?Wipe
Size
Set to 75% by default.
Softness
Set to 50% by default.
Start Direction
Controls if and how the direction of the transition changes with each use.
- Constant: the wipe always starts along the same direction, specified by the Angle parameter.
- Increase: on its first use, the wipe starts in the direction specified by the Angle parameter. On subsequent uses, the angle is increased by the amount specified by the Increment parameter.
- Flip: on its first use, the wipe starts in the direction specified by the Angle parameter. On subsequent uses, the angle is flipped to the opposite direction.
- Randomize: the wipe transition starts in a random direction at every use.
Please note that the transition may change direction as it progresses. This behavior is controlled by the End Direction parameter.
Angle
Set to 0° by default.
The initial direction of the transition, on its first use.
The direction may change on subsequent uses, a behavior controlled by the Start Direction parameter. The transition may also shift direction as it progresses, a behavior controlled by the End Direction parameter.
Increment
Angle set to 90° by default.
End Direction
Controls the final direction of the transition.
- Same as start: the direction does not change as the transition progresses.
- Offset from start: the direction changes as the transition progresses by the the amount specified by the Offset parameter.
- Randomize: the direction changes by a random amount.
As for all randomized aspects of the output, you can force a new set of choices by assigning a new Seed parameter value under the Advanced group.
Offset
Angle set to 60° by default.
Flip Offset
On by default.
On its first use, the transition will only offset the direction by the value of the Offset parameter. When this option is enabled, the offset will be flipped on all subsequent uses.
For example, if the Offset parameter is set to 45˚, on its next use the transition will use an offset of -45˚, and keep alternating between these two values indefinitely.
This parameter is only available when End Direction is set to Offset.
Halftone
Process
The following options are available:
Line
On by default.
Hatched
On by default.
Dot
On by default.
Circular
On by default.
CMYK
Off by default.
Scale
Set to 10% by default.
Sharpness
Set to 75% by default.
Edges
Set to 75% by default.
Shadows
Set to 25% by default.
Detail
Set to 50% by default.
Ink Color
Controls the color used to render the halftone pattern onscreen.
This parameter is not available for the CMYK technique, since it uses multiple ink colors.
Page Color
Controls the background color behind the halftone pattern.
This parameter is not available for the CMYK technique.
CMYK Hue
Angle set to 0° by default.
Blend Mode
The following options are available:
Angle
Set to 45° by default.
Angle Offset
Set to -90° by default.
Split Channels
Controls which channels are shifted to simulate chromatic aberration.
- Red and green: Offset the red and green channels while leaving the blue channel untouched.
- Red and blue: Offset the red and blue channels while leaving the green channel untouched.
- Green and blue: Offset the green and green channels while leaving the red channel untouched.
The following options are available:
Split Amount
Set to 0.1 by default. Only values between -1 and 1 are allowed.
Transition: Mod
A vintage transition based on a wavy, groovy geometric pattern whose shapes grow to reveal pixels in the next image.
Transition: Mod
Size
Set to 25% by default.
Stretch
Set to 50% by default.
Origin
Location
The following options are available:
Increment by
Angle set to 90° by default.
Value must be between 0° and 0°.
Angle used to move the origin of the geometric pattern around the frame. This value is added with each use of the transition.
This parameter is only available when Location is set to Increment at each image.
Winding Angle
Set to 90° by default.
Value must be between 0° and 0°.
Winding Animation
The following options are available:
Transition: Origami
A 3D transition that can fold or unfold one image to reveal another within (or below it).
Transition: Origami
Corner
The following options are available:
Animate Corner
The following options are available:
Fold
The following options are available:
Shadows
Set to 50% by default.
Transition: Pixelate Dissolve
A transition that pixelates one image to reveal the next when the effect reaches its peak.
Transition: Pixelate Dissolve
Size
Set to 20% by default.
Overexposure
Set to 50% by default.
Speed
Set to 100% by default.
Transition: Pixelate Wipe
A wipe transition that pixelates its area as it sweeps across one image to reveal the next. Chromatic aberration and scanlines lend a more organic look to an otherwise classic effect.
Transition: Pixelate Wipe
Presets
Presets saved and applied through this parameter affect only to parameters within the Transition: Pixelate Wipe group. While no built-in presets are available through this parameter, you can still save and load your own preset files.
How do I use the presets popup menu?Wipe
Size
Set to 50% by default.
Start Direction
Controls if and how the direction of the transition changes with each use.
- Constant: the wipe always starts along the same direction, specified by the Angle parameter.
- Increase: on its first use, the wipe starts in the direction specified by the Angle parameter. On subsequent uses, the angle is increased by the amount specified by the Increment parameter.
- Flip: on its first use, the wipe starts in the direction specified by the Angle parameter. On subsequent uses, the angle is flipped to the opposite direction.
- Randomize: the wipe transition starts in a random direction at every use.
Please note that the transition may change direction as it progresses. This behavior is controlled by the End Direction parameter.
Angle
Set to 0° by default.
The initial direction of the transition, on its first use.
The direction may change on subsequent uses, a behavior controlled by the Start Direction parameter. The transition may also shift direction as it progresses, a behavior controlled by the End Direction parameter.
Increment
Angle set to 90° by default.
End Direction
Controls the final direction of the transition.
- Same as start: the direction does not change as the transition progresses.
- Offset from start: the direction changes as the transition progresses by the the amount specified by the Offset parameter.
- Randomize: the direction changes by a random amount.
As for all randomized aspects of the output, you can force a new set of choices by assigning a new Seed parameter value under the Advanced group.
Offset
Angle set to 60° by default.
Flip Offset
On by default.
On its first use, the transition will only offset the direction by the value of the Offset parameter. When this option is enabled, the offset will be flipped on all subsequent uses.
For example, if the Offset parameter is set to 45˚, on its next use the transition will use an offset of -45˚, and keep alternating between these two values indefinitely.
This parameter is only available when End Direction is set to Offset.
Pixelate
Scale
Set to 50% by default.
Scanlines Intensity
Set to 50% by default.
Scanlines Thickness
Set to 5% by default.
Split Channels
Controls which channels are shifted to simulate chromatic aberration.
- Red and green: Offset the red and green channels while leaving the blue channel untouched.
- Red and blue: Offset the red and blue channels while leaving the green channel untouched.
- Green and blue: Offset the green and green channels while leaving the red channel untouched.
The following options are available:
Split Amount
Set to 0.15 by default. Only values between -1 and 1 are allowed.
Transition: Push
A basic yet beautiful transition that moves one image out of the frame as it moves the next image into the frame.
Transition: Push
Presets
Presets saved and applied through this parameter affect only to parameters within the Transition: Push group. While no built-in presets are available through this parameter, you can still save and load your own preset files.
How do I use the presets popup menu?Start Direction
Controls if and how the direction of the transition changes with each use.
- Constant: the wipe always starts along the same direction, specified by the Angle parameter.
- Increase: on its first use, the wipe starts in the direction specified by the Angle parameter. On subsequent uses, the angle is increased by the amount specified by the Increment parameter.
- Flip: on its first use, the wipe starts in the direction specified by the Angle parameter. On subsequent uses, the angle is flipped to the opposite direction.
- Randomize: the wipe transition starts in a random direction at every use.
Please note that the transition may change direction as it progresses. This behavior is controlled by the End Direction parameter.
Angle
Set to 0° by default.
The initial direction of the transition, on its first use.
The direction may change on subsequent uses, a behavior controlled by the Start Direction parameter. The transition may also shift direction as it progresses, a behavior controlled by the End Direction parameter.
Increment
Angle set to 90° by default.
End Direction
Controls the final direction of the transition.
- Same as start: the direction does not change as the transition progresses.
- Offset from start: the direction changes as the transition progresses by the the amount specified by the Offset parameter.
- Randomize: the direction changes by a random amount.
As for all randomized aspects of the output, you can force a new set of choices by assigning a new Seed parameter value under the Advanced group.
Offset
Angle set to 60° by default.
Flip Offset
On by default.
On its first use, the transition will only offset the direction by the value of the Offset parameter. When this option is enabled, the offset will be flipped on all subsequent uses.
For example, if the Offset parameter is set to 45˚, on its next use the transition will use an offset of -45˚, and keep alternating between these two values indefinitely.
This parameter is only available when End Direction is set to Offset.
Separation
Set to 25% by default.
Transition: Radial Wipe
A classic transition that reveals the next image through a wipe whose shape and motion resembles that of a watch whose hand spins around the frame.
Transition: Radial Wipe
Center
A point parameter centered in the frame by default.
How do I adjust the location on-screen?
Feather
Set to 0 by default.
The slider is limited to values between 0 and 1 but you can type values between 0 and 0 by clicking on the current value in the inspector.
Start Angle
Set to 90° by default.
Value must be between 0° and 0°.
Clockwise
On by default.
Transition: Scatter Wipe
A wipe transition that scatters pixels as it sweeps across one image to reveal the next.
Transition: Scatter Wipe
Presets
Presets saved and applied through this parameter affect only to parameters within the Transition: Scatter Wipe group. While no built-in presets are available through this parameter, you can still save and load your own preset files.
How do I use the presets popup menu?Wipe
Size
Set to 25% by default.
Start Direction
Controls if and how the direction of the transition changes with each use.
- Constant: the wipe always starts along the same direction, specified by the Angle parameter.
- Increase: on its first use, the wipe starts in the direction specified by the Angle parameter. On subsequent uses, the angle is increased by the amount specified by the Increment parameter.
- Flip: on its first use, the wipe starts in the direction specified by the Angle parameter. On subsequent uses, the angle is flipped to the opposite direction.
- Randomize: the wipe transition starts in a random direction at every use.
Please note that the transition may change direction as it progresses. This behavior is controlled by the End Direction parameter.
Angle
Set to 0° by default.
The initial direction of the transition, on its first use.
The direction may change on subsequent uses, a behavior controlled by the Start Direction parameter. The transition may also shift direction as it progresses, a behavior controlled by the End Direction parameter.
Increment
Angle set to 90° by default.
End Direction
Controls the final direction of the transition.
- Same as start: the direction does not change as the transition progresses.
- Offset from start: the direction changes as the transition progresses by the the amount specified by the Offset parameter.
- Randomize: the direction changes by a random amount.
As for all randomized aspects of the output, you can force a new set of choices by assigning a new Seed parameter value under the Advanced group.
Offset
Angle set to 60° by default.
Flip Offset
On by default.
On its first use, the transition will only offset the direction by the value of the Offset parameter. When this option is enabled, the offset will be flipped on all subsequent uses.
For example, if the Offset parameter is set to 45˚, on its next use the transition will use an offset of -45˚, and keep alternating between these two values indefinitely.
This parameter is only available when End Direction is set to Offset.
Scatter
Scale
Set to 25% by default.
Distance
Set to 25% by default.
Overexposure
Set to 25% by default.
Split Channels
Controls which channels are shifted to simulate chromatic aberration.
- Red and green: Offset the red and green channels while leaving the blue channel untouched.
- Red and blue: Offset the red and blue channels while leaving the green channel untouched.
- Green and blue: Offset the green and green channels while leaving the red channel untouched.
The following options are available:
Split Amount
Set to 0.1 by default. Only values between -1 and 1 are allowed.
Transition: Slice
A transition that cuts one image into slices and moves each off the frame as equivalent slices from the next image are animated on screen.
Transition: Slice
Presets
Presets saved and applied through this parameter affect only to parameters within the Transition: Slice group. While no built-in presets are available through this parameter, you can still save and load your own preset files.
How do I use the presets popup menu?Slices
Set to 3 by default. Only values between 1 and 100 are allowed.
Delay
Set to 50% by default.
Overlap
Set to 20% by default.
Start Direction
Controls if and how the direction of the transition changes with each use.
- Constant: the wipe always starts along the same direction, specified by the Angle parameter.
- Increase: on its first use, the wipe starts in the direction specified by the Angle parameter. On subsequent uses, the angle is increased by the amount specified by the Increment parameter.
- Flip: on its first use, the wipe starts in the direction specified by the Angle parameter. On subsequent uses, the angle is flipped to the opposite direction.
- Randomize: the wipe transition starts in a random direction at every use.
Please note that the transition may change direction as it progresses. This behavior is controlled by the End Direction parameter.
The following options are available:
Angle
Set to 30° by default.
The initial direction of the transition, on its first use.
The direction may change on subsequent uses, a behavior controlled by the Start Direction parameter. The transition may also shift direction as it progresses, a behavior controlled by the End Direction parameter.
Increment
Angle set to 90° by default.
End Direction
Controls the final direction of the transition.
- Same as start: the direction does not change as the transition progresses.
- Offset from start: the direction changes as the transition progresses by the the amount specified by the Offset parameter.
- Randomize: the direction changes by a random amount.
As for all randomized aspects of the output, you can force a new set of choices by assigning a new Seed parameter value under the Advanced group.
The following options are available:
Offset
Angle set to 60° by default.
Flip Offset
On by default.
On its first use, the transition will only offset the direction by the value of the Offset parameter. When this option is enabled, the offset will be flipped on all subsequent uses.
For example, if the Offset parameter is set to 45˚, on its next use the transition will use an offset of -45˚, and keep alternating between these two values indefinitely.
This parameter is only available when End Direction is set to Offset.
Transition: Whoosh
A classic transition that simulates a fast, blurry camera pan across the frame to reveal the next image.
Transition: Whoosh
Presets
Presets saved and applied through this parameter affect only to parameters within the Transition: Whoosh group. While no built-in presets are available through this parameter, you can still save and load your own preset files.
How do I use the presets popup menu?Direction
The following options are available:
Blur
Set to 10% by default.
Overexposure
Set to 50% by default.
Gap
Set to 20% by default.
Split Channels
Controls which channels are shifted to simulate chromatic aberration.
- Red and green: Offset the red and green channels while leaving the blue channel untouched.
- Red and blue: Offset the red and blue channels while leaving the green channel untouched.
- Green and blue: Offset the green and green channels while leaving the red channel untouched.
The following options are available:
Split Amount
Set to 1 by default. Only values between -1 and 1 are allowed.
Transition: Zoom
A transition that combines a zoom effect with a twist distortion to dissolve between one image and the next.
Transition: Zoom
Blur
Set to 5% by default.
Overexposure
Set to 40% by default.
Twist Angle
Set to 20° by default.
Twist Direction
The following options are available:
Split Channels
Controls which channels are shifted to simulate chromatic aberration.
- Red and green: Offset the red and green channels while leaving the blue channel untouched.
- Red and blue: Offset the red and blue channels while leaving the green channel untouched.
- Green and blue: Offset the green and green channels while leaving the red channel untouched.
The following options are available:
Split Amount
Set to 0.5 by default. Only values between -1 and 1 are allowed.
Titles
Titles
The following options are available:
Titles: Appearance
Parameters in this group allow you to enable and customize titles.
Titles: Appearance
Presets
Presets saved and applied through this parameter affect only to parameters within the Titles: Appearance group. While no built-in presets are available through this parameter, you can still save and load your own preset files.
How do I use the presets popup menu?Font Name
Font parameter set to Helvetica Bold by default. The first popup menu allows you to choose a font family. The second popup menu allows you to choose a typeface among those supported by the font:

Font Size
Set to 25% by default.
Text Color
Text Alignment
The following options are available:
Wrap
Off by default.
Max Line Width
Set to 80% by default.
Maximum width of each line, relative to its enclosure.
When embedding titles in image, the image acts as the enclosure. When floating titles above images, the frame acts as the enclosure.
When a word would exceed the maximum width allowed for a line, it is wrapped to a new line.
Horizontal Anchor
Set to 50% by default.
Relative horizontal position of the title within its enclosure.
A value of 25% means that whatever text is generated, it is centered at 1/4 distance from the edge of the image or screen, depending on whether Titles is set to Embeddded or Floating.
Vertical Anchor
Set to 50% by default.
Relative vertical position of the title within its enclosure.
A value of 50% means that whatever text is generated, it is centered at 1/2 distance from the edge of the image or screen, depending on whether Titles is set to Embeddded or Floating.
Kerning Adjustment
Set to 0 by default. Only values between -1 and 1 are allowed.
Mask
The following options are available:
Blend Mode
Blend mode used to composite the title over its background.
Unavailable when Mask is set to In or Out since in that case the title is not visible in the output.
The following options are available:
Drop Shadow
Enable a drop shadow behind each title.
Please note that the current Blend Mode may affect your ability to see the drop shadow applied to the text.
Drop Shadow Radius
Set to 10% by default.
Drop Shadow Color
Drop Shadow X
Set to 0 by default. Only values between -1 and 1 are allowed.
Drop Shadow Y
Set to -0.02 by default. Only values between -1 and 1 are allowed.
Background
Background
The following options are available:
Color
Fade In/Out
Adaptive Color
Set to 50% by default.
Controls whether the background is colorized according to the computed average color of the images currently displayed on screen.
Adaptive color is a powerful feature that creates a more natural fit between images animated on screen and the current background.
Background: Gradient
Parameters under this group are used when Solid color, Linear gradient, Radial gradient or Animated Gradient background is selected.
Background: Gradient
Start Color
End Color
Angle
Set to 0° by default.
Value must be between 0° and 0°.
Gradient Origin
Inner Size
Set to 20% by default.
Outer Size
Set to 40% by default.
Scale X
Set to 75% by default.
Scale Y
Set to 75% by default.
Speed
Set to 20% by default.
Background: Caustics
Simulates light rays reflected or refracted on by a fluid surface.
Background: Caustics
Light Rays Color
Background Color
Scale X
Set to 100% by default.
Scale Y
Set to 100% by default.
Angle
Set to 0° by default.
Amount
Set to 75% by default.
Speed
Set to 20% by default.
Background: Clouds
Background: Clouds
Cloud Color
Sky Color
Wind Direction
Angle set to 30° by default.
Wind Shift
Set to 0.25 by default. Only values between -1 and 1 are allowed.
Speed
Set to 10% by default.
Scale
Set to 25% by default.
Perturbance Amount
Set to 25% by default.
Perturbance Speed
Set to 25% by default.
Coverage
Set to 25% by default.
Coverage Shift
Set to 25% by default.
Coverage Speed
Set to 50% by default.
Background: Hyperspace
Background: Hyperspace
Presets
Presets saved and applied through this parameter affect only to parameters within the Background: Hyperspace group. While no built-in presets are available through this parameter, you can still save and load your own preset files.
How do I use the presets popup menu?Start Color
End Color
Shift Hue in Time
Set to 10% by default.
Shift Hue by Angle
Set to 0 by default. Only values between 0 and 1 are allowed.
Linear Speed
Set to 20% by default.
Controls the speed at which light rays travel from the center of the frame to the edges.
A value of 0% causes light rays to be still.
Angular Speed
Set to 0.01 by default. Only values between -1 and 1 are allowed.
Controls the speed at which all light rays rotate around the center of the frame.
Positive values rotate the pattern clockwise, negative values rotate the pattern counter-clockwise. A value of 0 disables any rotation.
Fade to Center
Set to 100% by default.
Ray Length
Set to 50% by default.
Ray Thickness
Set to 25% by default.
Ray Density
Set to 5% by default.
Ray Twirl
Set to 0.05 by default. Only values between -1 and 1 are allowed.
Controls the distortion applied to light rays as they travel across the frame.
Negative values twirl the light rays in one direction, positive values in the other.
Defocus
The following options are available:
Defocus Amount
Set to 25% by default.
Motion Blur
Motion Blur
Motion Blur
Enables motion blur at different quality settings. The higher the quality, the more samples are used. Multiple samples are blended together to produce a single frame of output.

Shutter Angle and Offset
The Shutter Angle slider controls the size (aperture) of the shutter used to simulate motion blur. The size of the shutter determines how long light is allowed to pass through the lens. The angle is set to 90° by default. A shutter angle of 360° means that samples are collected for the entire duration of the frame.
Setting a value of zero means that you want the shutter to collect light only once, which is equivalent to turning motion blur off.
The Shutter Offset slider controls the moment in time when the shutter opens and closes, relative to the duration of the frame. The offset is set to 0 by default. An offset of zero means the shutter is perfectly centered over the moment in time when the frame occurs. The shutter is therefore open an equal amount of time before and after the current frame occurs.
The Shutter Angle and Shutter Offset parameters are only available when motion blur is enabled.
Advanced
Advanced
Resolution
The following options are available:
Build In Transition
Controls which transition to use at the very start of the image sequence animation.
Because this parameter affects the transition into the first image, it is only available if the Build In option under Transitions is on.
On its default value of Inherited, the transition used at the beginning of the animation is dependent on the value selected in the Transition parameter. In other words, it could be randomized, or it could be the same transition style used for all images.
The following options are available:
Delay start (secs)
Set to 0 by default. Only values between 0 and 120 are allowed.
Seconds to wait before the photo sequence animation begins.
This parameter is only available when the Build In option is on, since it controls when the transition to the first image in the sequence begins.
Loop
Off by default.
Seed
A number that controls random aspects of the output.
Click the button to assign a new seed value. When the seed value is changed, the effect makes new random choices to produce a different output.