One of the hardest problem facing plug-in developers is designing effects that work at the native pixel aspect ratio of any source media fed to the plug-in. FxFactory plug-ins are based on compositions that mix together Core Image units and other Metal-based geometry and shaders, often assuming that all inputs and outputs process pixels with a square aspect ratio.
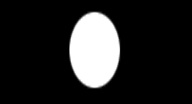
Why is native aspect ratio a problem in the first place? Host applications usually feed video frames to plug-ins at the size and pixel aspect ratio determined by the timeline or sequence. For example, if your effect is applied inside an anamorphic 1080i sequence in Premiere Pro, the plug-in is asked to process one field at a time. Each field has resolution of 1440x540 pixels. That is obviously quite different from its ultimate display size of 1920x1080. If your composition draws a circle inside that 1440x540 field, by the time the circle is scaled to the final display resolution you end up with a nasty-looking oval:

Each video app behaves differently. Motion and After Effects always field-double their images. The same 1440x540 field is fed as a 1440x1080 image (notice the doubling of its height). Final Cut Pro supports plug-ins only when wrapped inside Motion Templates. It borrows most of its behaviors from Motion, including the habit of field-doubling all frames before processing.
The Easy Way Out
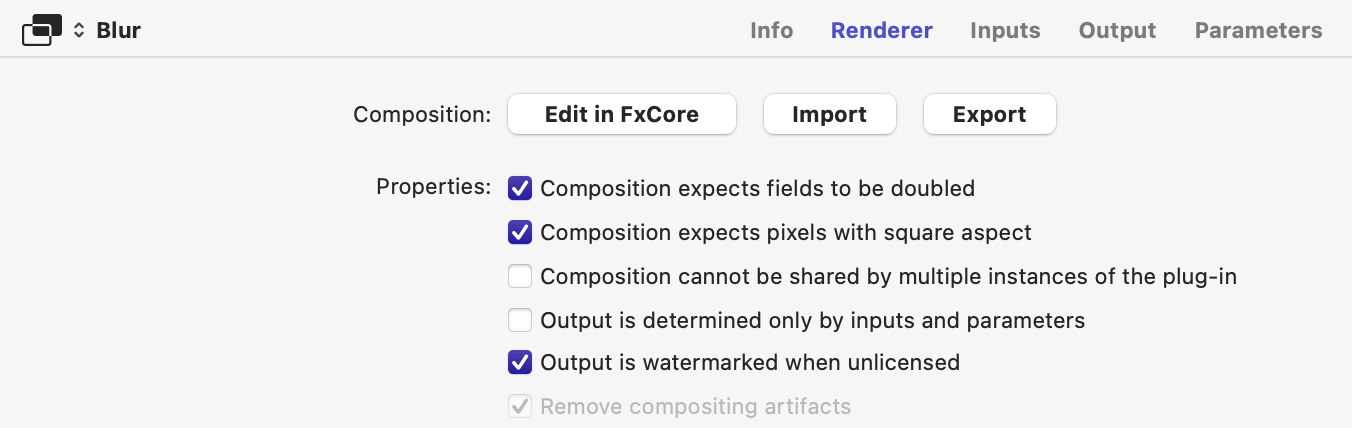
To make effects development as simple as it can be, FxFactory has always provided an easy way out by enabling the following options under the Renderer section:
- Composition expects fields to be doubled
- Composition expects pixels with square aspect
With both options on, you are asking FxFactory to scale all inputs to the composition to be field-doubled (1.) and transformed to square aspect (2.):
The method described above is widely used by many FxFactory plug-ins because it greatly simplifies the design and development of the composition. Unfortunately the method implies that images are being scaled automatically to have the required pixel aspect ratio, and therefore it is the source of filtering artifacts. Before discussing that problem in depth, let’s list scenarios where it is (and always will be) desirable to continue enabling those options:
- Generators: if you are generating your own content, it doesn't matter if it potentially produces more pixels at a square pixel aspect. When the output is scaled down to native size there are desirable side effects. The downscaling process provides anti-aliasing for the output with a modest cost in performance and resource consumption.
- Generators (again!): if the media you use is heavily distorted or stylized, it doesn't matter if the plug-in does not render at the native resolution. Output quality may actually benefit (again) from super-sampling!
- Stylized filters/transitions: if your effect heavily modifies the source, to the point where the original color information, features, etc... are replaced or barely visible, it's OK to rely on FxFactory's automatic scaling (e.g. half-toning filters).
- Very hard to do otherwise: some effects, especially those involving 3D transformations, lighting effects, etc. are very hard to design, and even harder to design with support for native pixel aspect ratio. The time you would spend in getting it all to work at native pixel aspect ratio would probably be better spent making tutorials, documentation, etc. or more plug-ins.
Limits of “The Easy Way Out”
When designing high-quality effects, the automatic scaling performed by FxFactory may introduce unwanted filtering artifacts. These are worse with interlaced media than with progressive media, and they are worse in Premiere Pro than other video apps. Final Cut Pro, Motion and After Effects always field-double their media. For example, a plug-in that processes 1440x540 fields at their native resolution will be faster than an identical effect that relies on FxFactory to upscale fiels to 1920x1080 images, and downscale the output of the plug-in back to field-size.
Life doesn’t have to be hard all the time!
If your plug-in does not render any geometry and does not use filters that rely on a geometric distance (such as a blur radius) you can safely disable the Renderer options discussed earlier. Color correction filters are a common example for a category of effects that can trivially support native pixel aspect ratio.
You can test this problem very easily. Take a simple pass-through filter:
Enable the Renderer options discussed earlier:
This instructs FxFactory to scale inputs to the composition from native to square-pixel aspect when rendering a frame. The output of the composition is then scaled from square-pixel to native pixel aspect.
Find a test graphic that is designed to help you spot filtering artifacts, such as this grid:

Apply the passthrough filter to get the following result:

Notice the unwanted softness introduced by the filter because of the automatic scaling, even if the composition is not actually doing anything with its input.
Solutions
There is no general approach to handling native pixel aspect ratio correctly. The most important step is actually understanding what's going on behind the scenes. Then, depending on the effect you are designing, one of the following techniques may be used:
- If the effect simply involves rendering an overlay over the original media, the composition can:
- Figure out what the square pixels dimensions of the media are. For example, a 1440x540 field really has 1920x1080 square pixel dimensions. How exactly can you figure out the square pixel dimensions of any input media? The answer lies in using the information passed to the composition via one of its Image Info inputs. The FxFactory Effect node helps you extract the native pixel aspect ratio of each image input from its Image Info inputs.
- Render its overlay at the square pixel dimensions.
- Scale the overlay down to the native frame size, and composite over the original media.
- The composition scales all inputs from their (potentially different) pixel aspect ratios to a square pixel aspect ratio. This is your worst nightmare come true: think of a complex transition with additional image inputs, applied between two 1080i clips. The user may drop a 720p clip into the first image well, and a 4K clip into the second one. Three different resolutions and two different pixel aspect ratios to deal with!
This technique can be summed up as adding a normalization step to your composition:

- All image processing is performed on scaled versions of inputs that have a square pixel aspect ratio.
- Point parameters that express a location in the frame using 2D coordinates need to be adjusted to find the corresponding 2D location in square-pixels space:

- The output is scaled back to the native dimensions of the frame:
- You are lucky enough to be working with existing Core Image units that can be used with images that have any pixel aspect ratio, or you can design the effect using special variants of Core Image units that can handle pixel aspect ratio for you (more on those in the sections below).
- You design a custom Core Image unit that is capable of rendering its geometric features with different settings for the horizontal and vertical axes, so that you can compensate for the pixel aspect ratio with a bit of math.
- You don't do any work at all! There are plug-ins that do not render geometry, or do not rely on any geometric feature (such as the radius of a kernel) and you get the extra speed and quality at no cost. Most color correction filters fall into this category.
Unfortunately, some of the stuff mentioned above can be very tricky to figure out, and it certainly comes in the way of FxFactory's goal of keeping things as simple as they can be. That's why FxFactory includes improved versions of built-in effects (Core Image units) that handle pixel aspect ratio. You can spot these in the Library because they have identical names to the built-in units, except for a superscript that hints at their different nature:

The main difference between our versions and Apple's is that our units include an extra "Pixel Aspect Ratio" input. By virtue of doing that, we have created units that are capable of honoring non-square pixel aspect ratios.
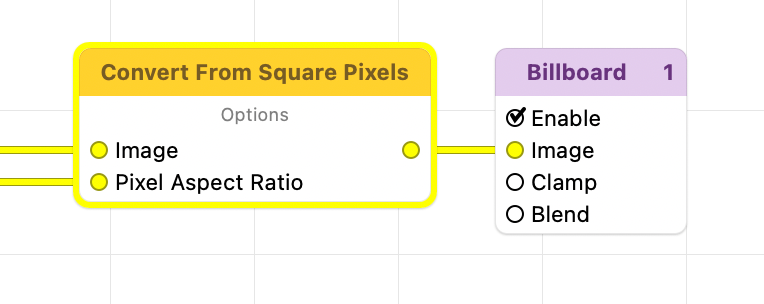
When creating a new filter in FxFactory, notice that the composition you start with looks like this:
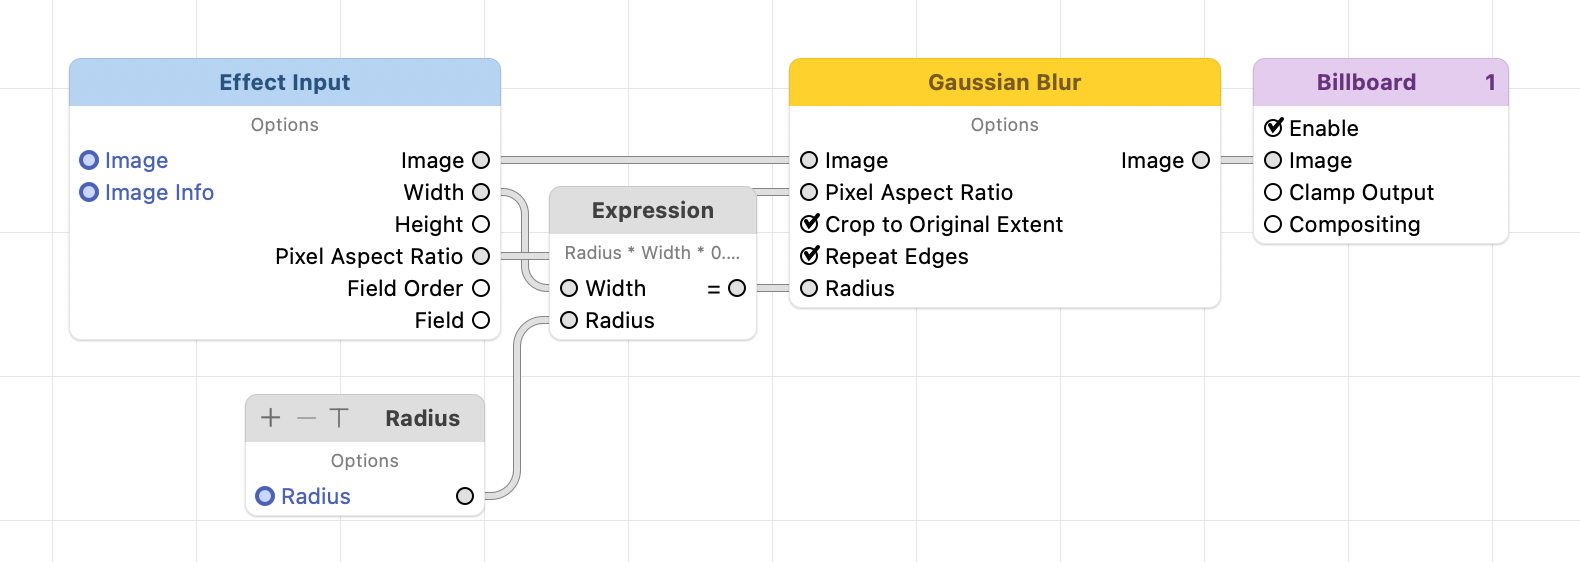
Notice the Gaussian Blur unit being used accepts the native pixel aspect ratio as an input. Feed it the Pixel Aspect Ratio value obtained through the FxFactory Effect node.
One Last Warning
The FxCore application only uses images with a square pixel aspect, making it hard to predict what may happen when the same composition is fed video frames at their native aspect.
When attempting to design and test a composition that handles native aspect ratio, it is necessary to test the plug-in inside a video application with media of various characteristics to know if it can truly handle non-square pixel aspect.