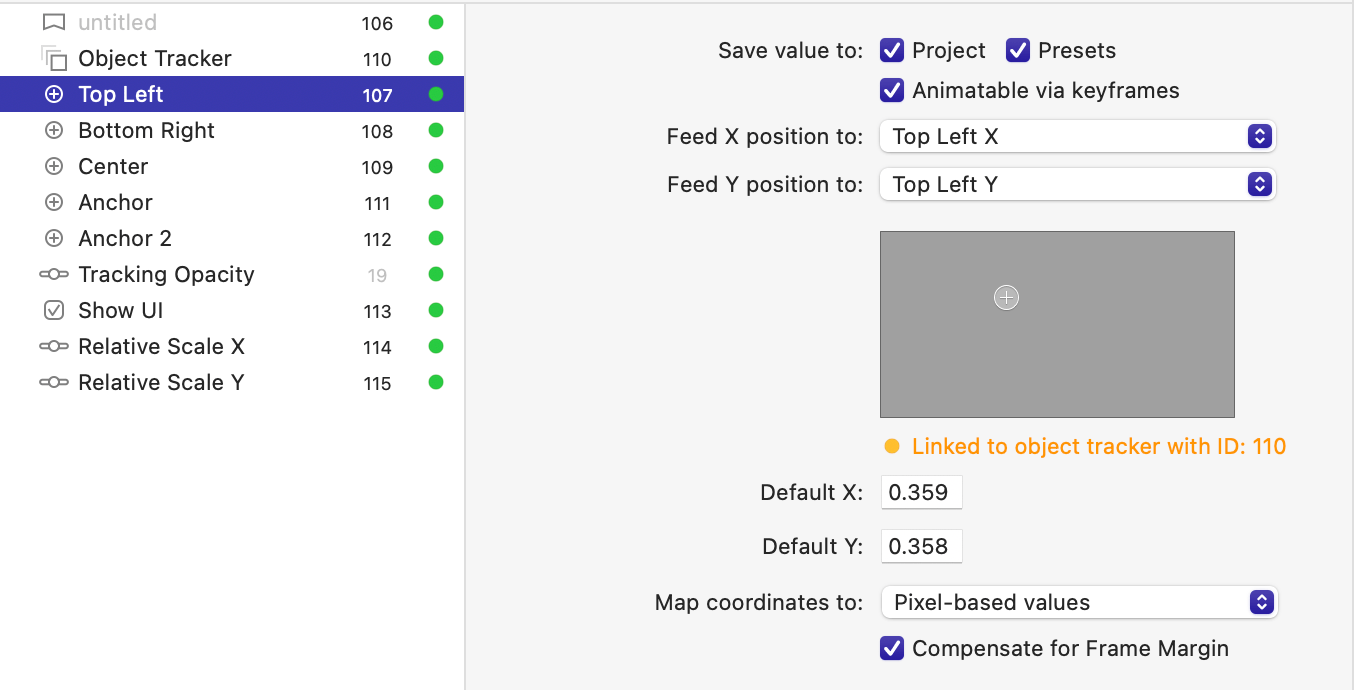
This parameter allows you to integrate an object tracker inside any filter plug-in. The object tracker is currently available only for FxPlug hosts. The Object Tracker relies on existing point parameters to define trackable objects within the Canvas. This allows optimal integration with Motion Template development, since the coordinates of the tracked objects are accessible to other parameters via parameter linking.
Convenient access to parameter linking does not imply a sub-par user experience. FxFactory displays each trackable object through standard, resizable regions in the Canvas.
Object Tracking via the Vision framework
The object tracker included with FxFactory extends functionality provided by the Vision framework. It is currently limited to tracking objects defined through a rectangular region or convex quadrilateral. Each case is handled through slightly different on-screen UI. At the moment, the object tracker is not capable of tracking changes to an object’s angle. It is capable of detecting changes in scale, but this option is off by default. The precision and quality of tracking is heavily dependent on the footage being analyzed. The object tracker does allow users to track objects forwards or backwards in time, and to refine the results of a previous analysis.
First Steps
An object tracker can be configured to track objects defined by a rectangular region of the frame. The rectangular region is defined by the coordinates of two existing point parameters in the plugin: one defines the top left corner and the other defines the bottom right corner of the region.
Optionally, the developer can also specify a center point and an anchor point. Both are provided as a convenience to Motion Template developers who may wish to link the location of other layers to the tracked object. When the analysis is complete and keyframes have been created, the center point will always correspond to the center coordinate of the tracked object. On the other hand, the anchor point will follow the tracked object along its trajectory while keeping the initial offset constant. The anchor point is designed to allow easier placement of callouts on-screen.
An object tracker that is configured to have both its required and optional point parameters will thus need four existing point parameters:
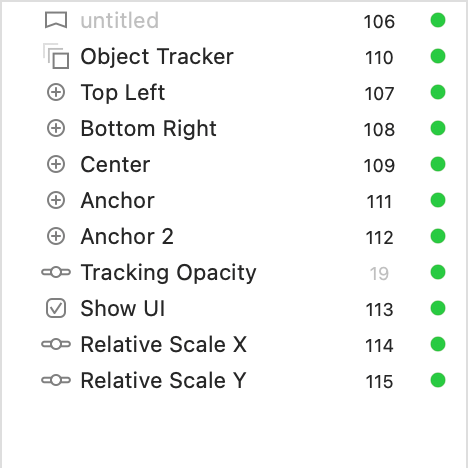
Every time a point parameter is associated with the top left, bottom right or center coordinate of a trackable object, it is no longer editable as a separate entity by either the user or the developer:
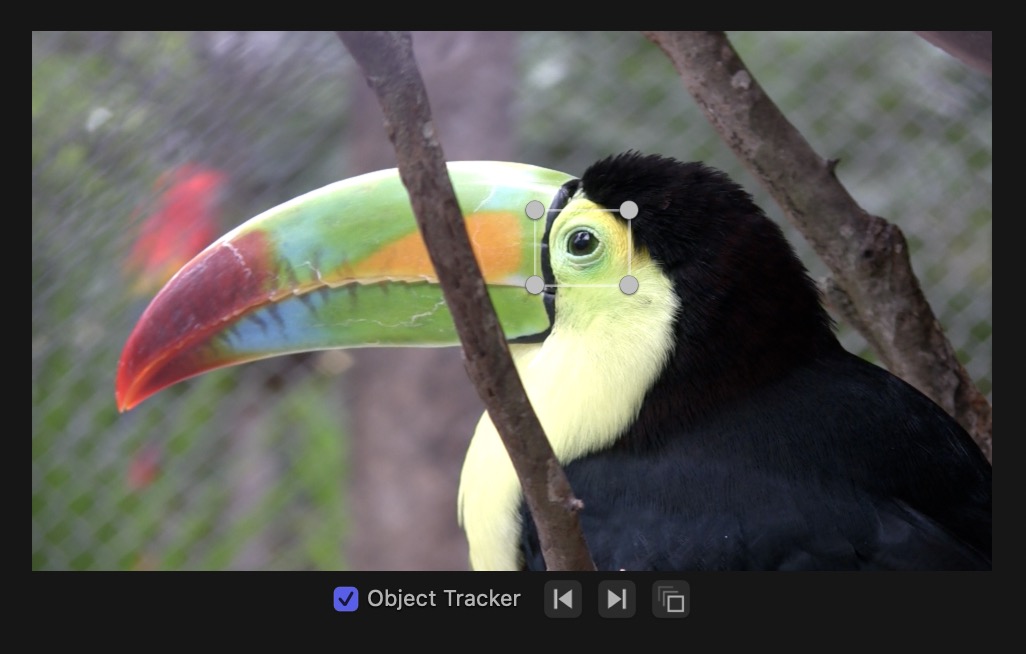
The custom on-screen UI implemented by FxFactory will display a rectangular region to allow the user to reposition and resize the trackable object.
Configuration
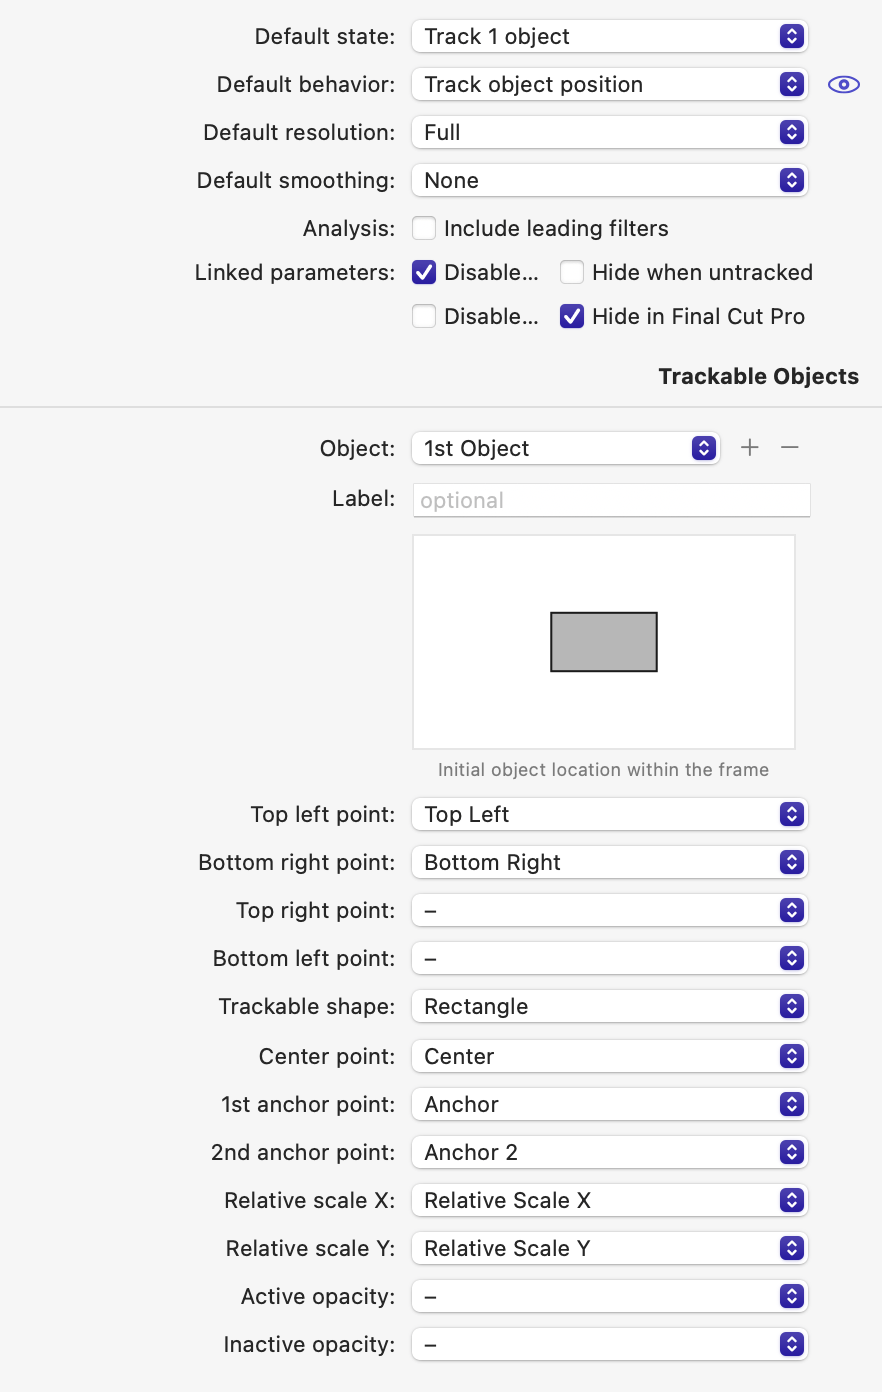
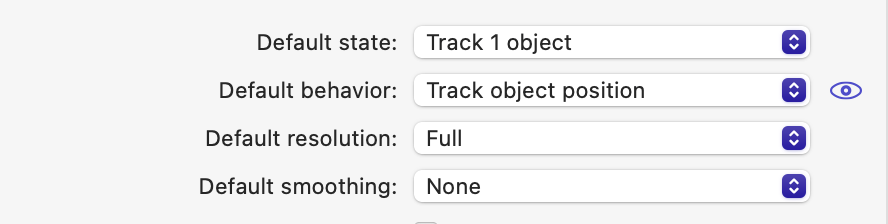
The object tracker has a set of default options: state, behavior, resolution and smoothing:
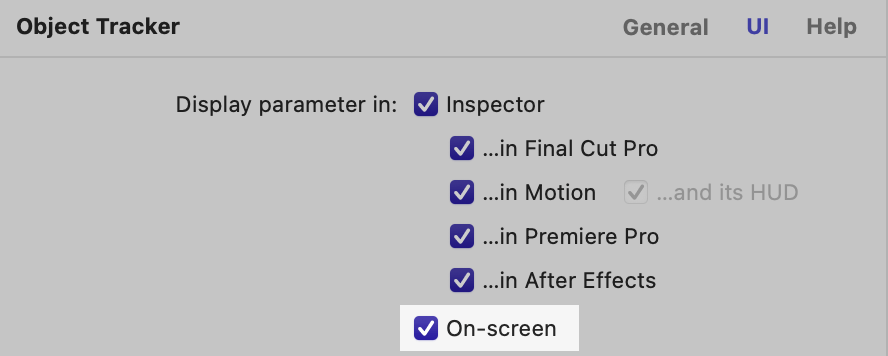
While the developer may choose defaults that make the most sense for the effect being designed, users can modify these choices through an options button available in the parameter inspector. The object tracker behavior cannot be customized unless you explicitly make it visible to the user by clicking the eye icon to the right of the popup menu. If you have opted to display the Object Tracker parameter on-screen, the options button is also available in the Canvas:
The Default state option lets you choose the initial state of the object tracker. When the object tracker is off, all of its associated on-screen controls are hidden, with the exception of the one that lets the user turn the object tracker back on. The possible choices available for the initial state are given by the number of objects being tracked. When the object tracker is associated with a single object, the user is presented with a checkbox to turn the object tracker on or off. When more than one object is being tracked, the user is presented with a popup menu to select anywhere from zero (object tracker is off) up to include all objects.
The Default behavior option lets you choose whether the object tracker will initially track only the position, or the position and scale of all trackable objects.
The Default resolution option lets you choose whether the object tracker will analyze frames at their full resolution, or half resolution. When processing 4K video, analyzing half-resolution frames can shave significant time from the analysis.
The Default smoothing option lets you choose the amount of smoothing applied to the trajectory of all tracked objects. When the value is None, the results of the object tracking analysis are faithfully reproduced in the set of keyframes created by the plug-in. On increasing levels of smoothing, the keyframes are created such as to eliminate fast changes in the tracked object position. This allows the object tracker to be used with footage that is extremely shaky and/or footage that has not been stabilized in a previous step.
Analysis
When the Analysis: Include leading filters option is on, the object tracker will analyze frames that include any upstream effects applied to the same clip. When designing a Motion Template, it can be useful to apply color corrections to the clip in order to influence and improve the analysis performed by the object tracker. When Include leading filters is on, the output of these leading filters is included in the analysis.
Point Parameters Associated with the Object Tracker
The Point parameters options let you define dynamic UI behavior that is specific to the point parameters associated with an object tracker. These options are in addition to the ones already specify through the standard Dynamic UI options provided by FxFactory:
- If the Disable... or Hide when untracked option is on, any point parameters associated with the object tracker (except for the Anchor point) are disabled or hidden if the object tracker is off. If the object tracker is configured to track multiple objects, the point parameters are also disabled or hidden if the specific object associated with the point parameters is not being tracked.
- If the Disable... of Hide in Final Cut Pro option is on, any point parameters associated with the object tracker are always disabled or hidden when running in Final Cut Pro.
By default, FxFactory disables all point parameters that are not linked to an active, trackable object. FxFactory also hides all point parameters when running in Final Cut Pro. This combination enables the best user experience for products destined for Final Cut Pro, as discussed in a later section.
Trackable Objects
The Trackable Objects section lets you define the number and initial state of every trackable object associated with the tracker. By default, every object tracker parameter is configured with one object. You can create more by clicking the "+" button. To define an object, you must link it with existing point parameters.
The Label text box lets you enter a name for the trackable object. The name is displayed when the user positions the mouse cursor above the trackable object. Naming each trackable object can be helpful to the user when the object tracker is configured to track multiple objects.
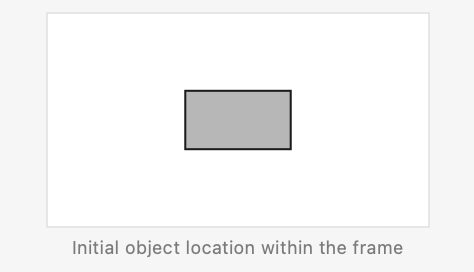
The Top left point and Bottom right point are required to be linked to existing point parameters in your plug-in. These two points will define the rectangular area of the trackable object. The initial location and size of the trackable object can be decided by clicking, dragging and resizing the small preview:
The Top right point and Bottom left point are either optional or required depending on the choice made in the Trackable shape option below:
- When Trackable shape is set to Rectangle, you can optionally link the top right and bottom left points so as to have easy access to those coordinates in your Motion Template. For example, if you are developing an effect that needs to render an asset at each one of the four corners of the tracked object, you will have an easier time if all four control points are readily available in the plug-in. They are optional in a general sense because the top left and bottom right points are enough to define a rectangular region in the canvas.
- When Trackable shape is set to Convex Quadrilateral, you are required to link the top right and bottom left points to actual point parameters. This is because the user is allowed to freely re-position each control point that defines the quadrilateral without the constraints imposed on a rectangular shape.
The 1st anchor point and 2nd anchor point can optionally be linked to an existing point parameter in your plug-in. When the analysis is complete, the anchor point follows the center of the tracked object alongs its trajectory, maintaining the same offset from the object throughout the trajectory. Anchor points are a natural choice when implementing callouts-style products, where an asset is supposed to follow the tracked object at an arbitrary offset.
Optimal User Experience in Final Cut Pro
The best user experience you can offer Final Cut Pro users is to have a functional object tracker, with easily adjustable regions in the Canvas, while keeping the point parameters that define each object hidden from the inspector. After all, defining a rectangular region by tweaking coordinates of its top left and bottom right corners could hardly be considered user-friendly. Although the above user experience is made possible by FxFactory, it helps to understand how this goal is reached.
When the object tracker completes its analysis phase, it creates a set of keyframes for all point parameters associated with its trackable objects. Final Cut Pro treats these keyframes differently based on whether the point parameters are published or not:
- If the point parameter is not published, Final Cut Pro will automatically compress/expand the keyframes when the clip is trimmed.
- If the point is published, keyframes are maintained at their original location relative to the clip, regardless of any adjustments made to the clip.
The solution implemented by FxFactory thus requires acting on two fronts. The first step is to leave the Hide when running in Final Cut Pro option enabled in the Object Tracker parameter. This tells FxFactory that as soon as dynamic UI rules are applied inside Final Cut Pro, it should always hide point parameters linked to an object tracker. Unfortunately that option alone is not enough. As mentioned earlier, Final Cut Pro honors the UI state of a parameter as it was saved in the Motion Template. To force Final Cut Pro to give us a chance to hide or disable these point parameters dynamically, we need to doctor the contents of the XML saved by Motion. Rather than doing it manually, your plug-in should rely on the Strip Metadata function available in the FxTemplates UI.
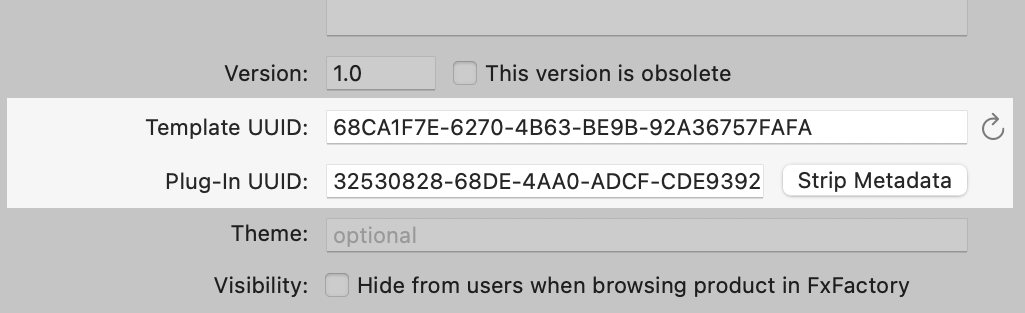
The UUID of the plug-in that contains the object tracker should be copied and pasted into the Plug-in UUID text box, at which point the Strip Metadata button becomes available. Clicking this button will rid the Motion Template of any UI state saved by Motion. The side effect of this process is that Final Cut Pro will use the default UI state reported by the plug-in, rather that whatever was stored in (and later stripped from) the XML. Because the Hide when running in Final Cut Pro option is on, FxFactory will report the initial state of every point parameter as hidden to Final Cut Pro. In practice, as a developer you are given visible point parameters to work with in Motion. You can link these parameters and most importantly you can publish these parameters so that keyframes work in a manner that suits the goals of an object tracker. The user, in Final Cut Pro, works exclusively through the on-screen UI and never sees the underlying point parameters in the inspector.
Improving Performance
In many cases, a filter that includes an object tracker will be used only in the context of a Motion Template for Final Cut Pro. The filter itself does not render any useful output within the Motion project. It is applied to the effect or title layer only with the ultimate purpose of creating keyframes.
Modify all your Motion templates accordingly:
- Edit each template in Motion.
- Select the filter that contains the object tracker, and switch to its parameters.
- Set the Mix value at the end of the parameters list to 0%:

When you set the mix slider to 0%, the host app will ignore any modifications made by your plugin to its layer, thus guaranteeing that the original media will render as is. You essentially turned the filter into a passthrough, while guaranteeing that the object tracker can still perform its analysis and create keyframes for you.