FxFactory offers an object tracker parameter to native plug-ins created through FxPacks.
To take advantage of this feature in your own Motion Templates, you will need to modify your product so as to have both an FxPack and FxTemplates components. The process is similar to that of adding custom UI to your effect, and as such, your first step should be to follow the instructions in that tutorial, making sure that you choose a filter effect rather than a generator to host your custom UI:
Adding Custom UI to Motion Templates
Once that first step is complete, you will have to modify your native plug-in to have as many point parameters as needed per trackable object. In the simplest case, an object can be defined by just two points: one for the top left and the other for the bottom right coordinate of a rectangular region. As you will learn in this tutorial, the object tracker allows you to define additional control points and non-rectangular shapes, which require more point parameters to be created in the plug-in.
How do you create a point parameter?
FxFactory has a + button that lets you conveniently add parameters to a plug-in. Unfortunately that feature is not immediately useful in the context of point parameters used by an object tracker. Instead, you will create additional published inputs in the composition, which will set you along the correct path:
- Switch to the Parameters section of your plug-in.
- Click the + button at the bottom of the parameter list to add an Object Tracker parameter:
- The newly created object tracker parameter will have 1 trackable object already defined, but none of its points have been mapped. In the next few steps, you will create additional published inputs in the composition.
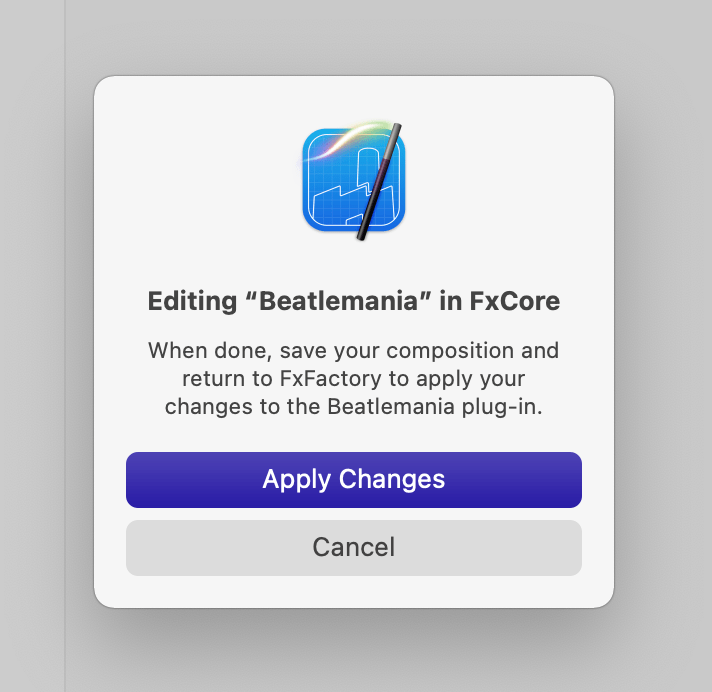
- Click the Edit in FxCore option to make changes to the composition that backs your plug-in:

- Delete any unnecessary logic in the composition, since your filter should render its input image without applying any modifications to it. Select all nodes in the composition except the Billboard, and hit the Delete key to remove them from the graph.
- Now that only the Billboard node is left, right-click on its Image input and select the Publish command:
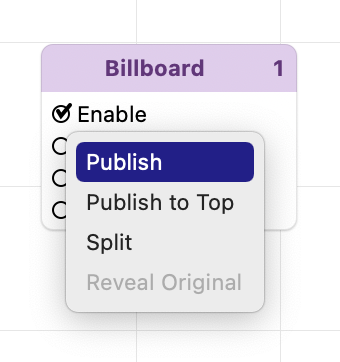
The billboard is now set to render whatever input image comes from the host app, unchanged.
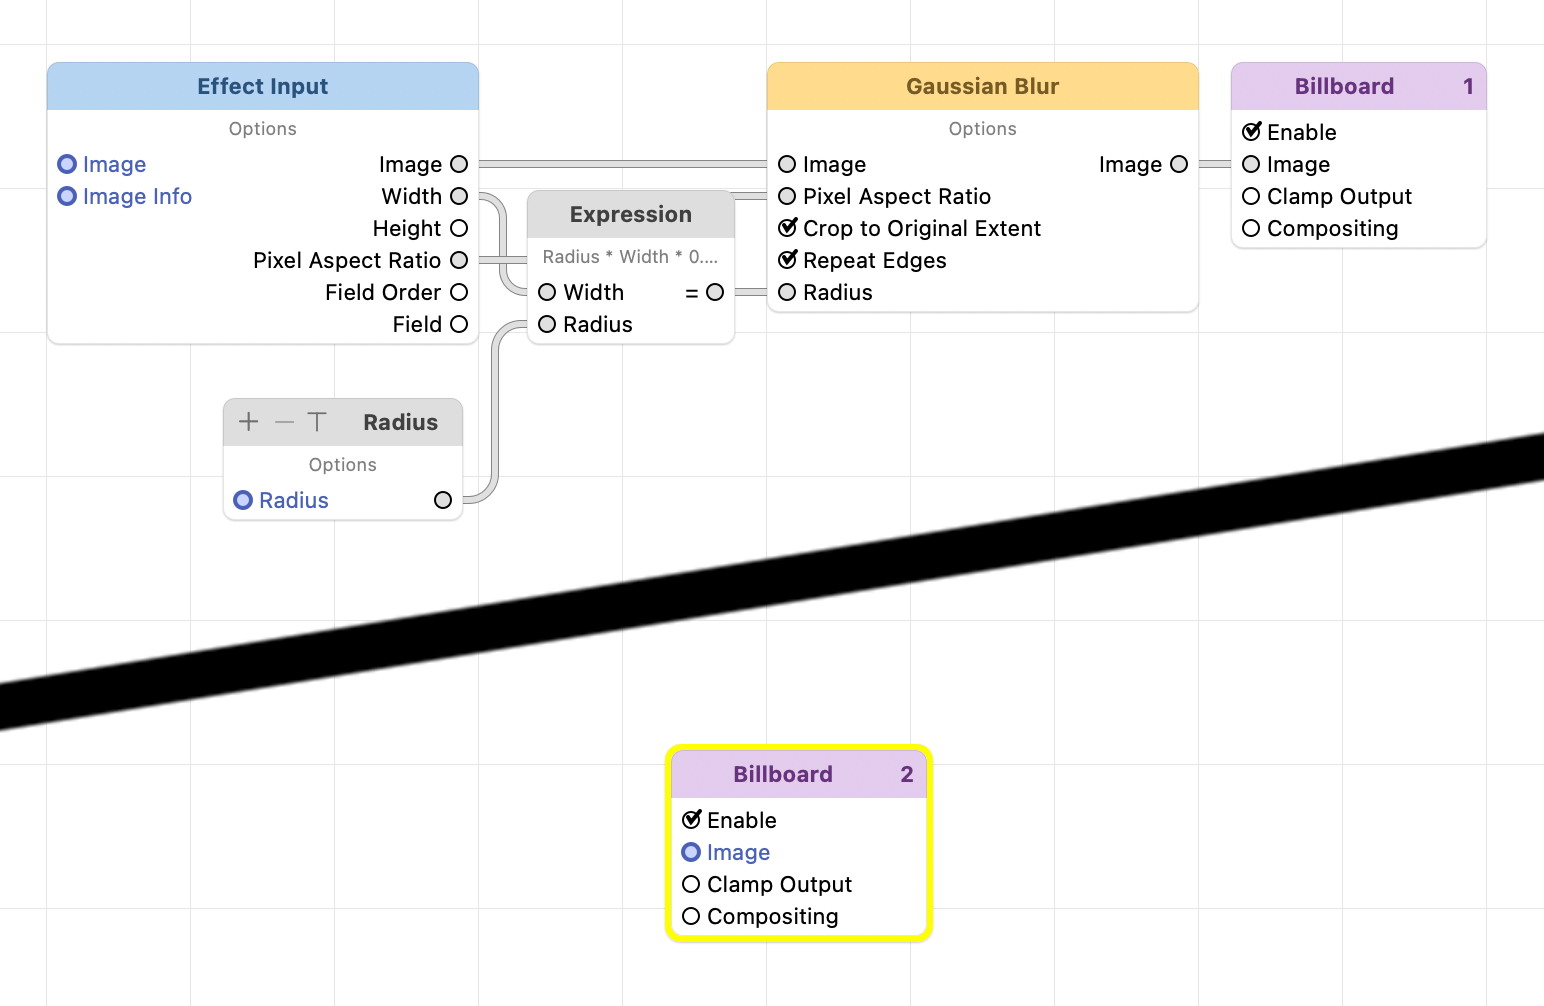
- The changes made so far to the composition should look like this:
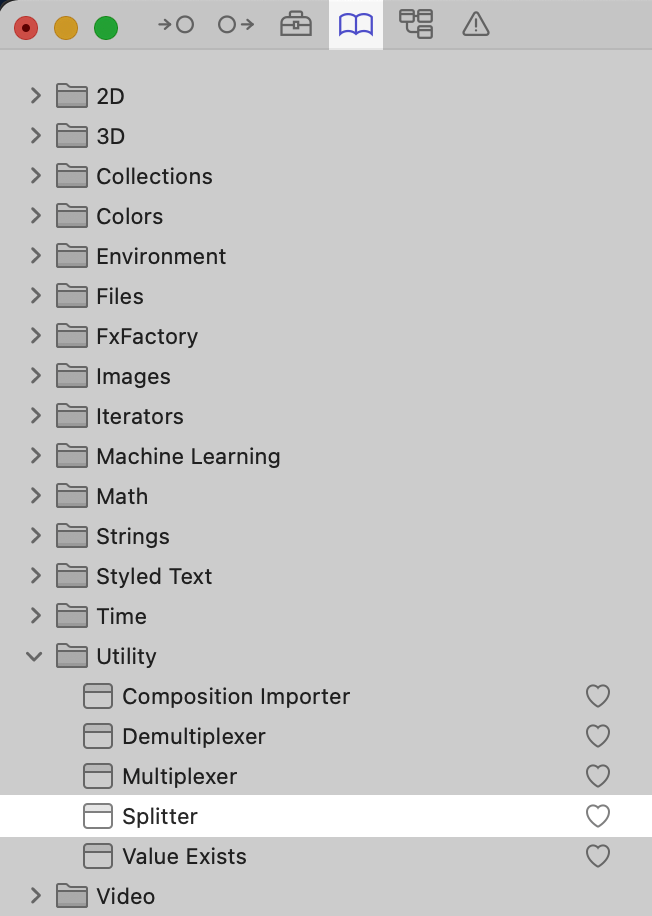
- Switch to the FxCore library and search for the Splitter node under the Utility group:
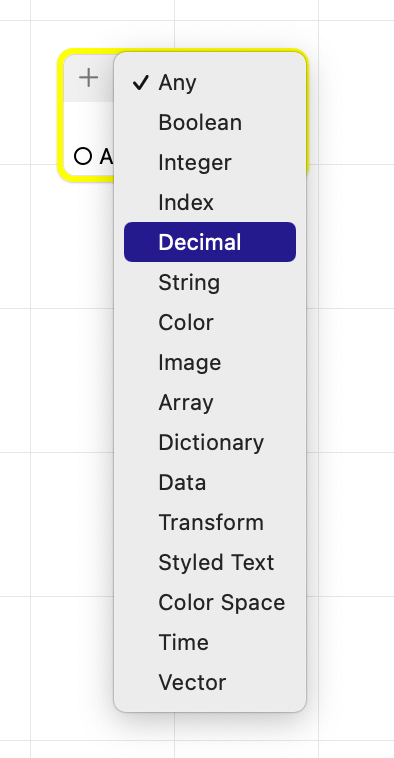
- Drag the Splitter node to an empty space in your graph. Change its type to Number by clicking its type icon to reveal a popup menu:
As a shortcut, FxCore also allows you to create a new node anywhere in the graph by right-clicking on empty space in the graph.
- Click the + icon to create additional inputs. All inputs in the splitter will be of the same type. You will need two inputs for each point you plan to define in the plug-in. One input will be used for the point’s X coordinate and one for its Y coordinate.
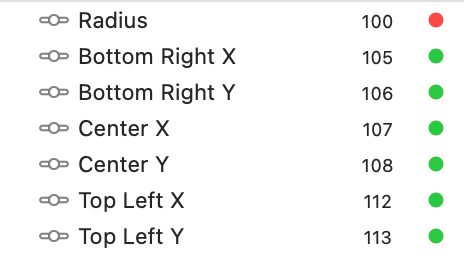
- Assuming that your object tracker will need access to the Top Left, Bottom Right and Center coordinates of the object being tracked, your splitter should publish 6 distinct numeric inputs. It helps to rename each input according to its intended role. Double-click the input title to edit its contents:
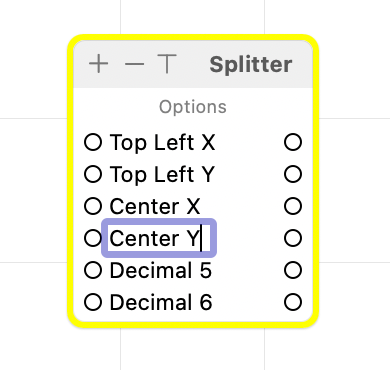
- In the example above, when creating the X and Y inputs that will ultimately be used for the Top Left point, the input splitters have been renamed to Top Left X and Top Left Y.
- Repeat the above process until all inputs have been created and labeled. Your last step is to publish these inputs so they are available to FxFactory. To publish an input, right-click on each circle to bring up a contextual menu:
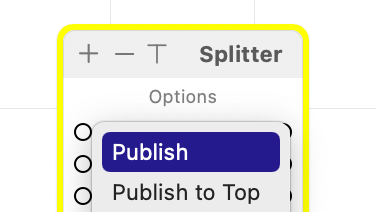
- Select the Publish command, and repeat for all inputs in the node. FxCore also offers a faster way of publishing and unpublishing an input: option-click within the circle. When an input is published, an outline appears around its circle.
- Save the composition and close it.
- Switch back to the FxFactory application.
- Click the Apply Changes button to read back the composition:
- FxFactory will now pick up all the new inputs you have published in the composition. If you also deleted some inputs to simplify the logic of the composition, FxFactory will also mark any unmapped parameters in red:
- Delete the unmapped parameters that are no longer required by your plug-in. Unmapped parameters have a red dot to the right of their name and ID.
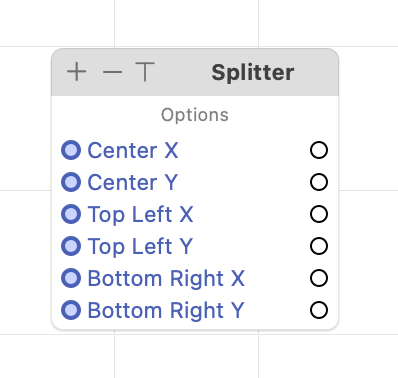
- Notice that FxFactory also created slider parameters for every numeric input splitter you published.
- Select two sliders and click the Join button at the bottom of the parameter list:
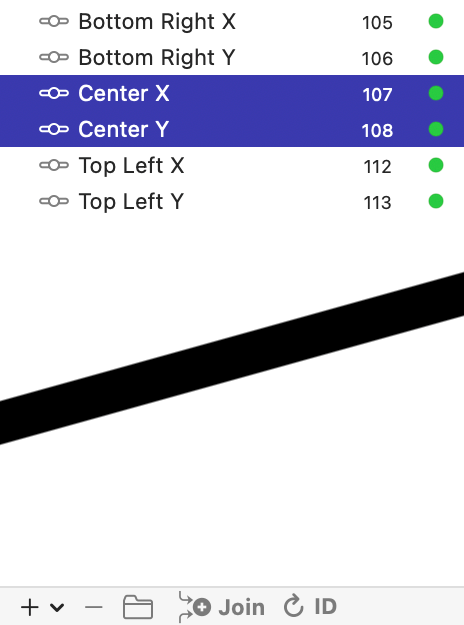
- When you join two sliders, a single point parameter is the result:
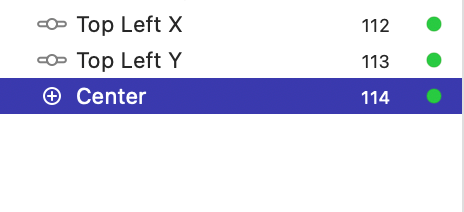
- Join all pairs of X and Y sliders to form point parameters.
- All point parameters you have thus created are now available to be linked from your object tracker parameter.
If you ever need to add additional point parameters, repeat the relevant steps discussed above. Every time FxFactory notices that a composition has new published inputs, it will automatically create parameters to allow users to interact with those inputs. This best-guess is not always appropriate, as exemplified by the example above: to represent a location in your Canvas it is natural to prefer a single point parameter rather than two sliders.
Do I have to use a single plug-in for custom UI and object tracking?
The above tutorial assumes that a single filter in the FxPack serves both as a host for your custom UI elements and for your object tracker. This is not a requirement. Multiple approaches are possible, and this tutorial simply follows one of them.
Another approach that works well is to keep custom UI inside a generator plugin and create a separate filter within the same FxPack to host the object tracker. Remember that FxFactory also creates a watermark generator for your Motion Templates, which brings the total number of custom plugins in each template to three. In this particular setup:
- The filter with object tracking capability is applied to the effect or title layers, at the bottom of your layer hierarchy. Remember to set the filter’s Mix slider value to 0% for efficiency.
- The watermark generator should continue to appear at the very top of your layer hierarchy, so that the watermark is rendered above any other content.
- The custom UI generator can appear anywhere in the hierarchy, its layer disabled since your Motion Template does not need the output of the generator. An alternative to disabling the Watermark Generator layer is to set its output opacity to 0%.
What about the watermark?
There is more than one way to build a product, and more than one way to delegate the responsibility of rendering a watermark. Ultimately only one plugin, present in every Motion Template, should be rendering a watermark. And ultimately only one plugin in each Motion Template should have its "Publish OSC" parameter enabled, so that you provide only one row of buttons to users. In the scenario described so far you should have:- One or two plugins in the FxPack, for custom UI and object tracking.
- The "Requires watermark" option in the FxPack should be off.
- The "Requires watermark generator" option in the FxTemplates should be on.
- Each Motion Template should contain an instance of the watermark generator, corresponding to the product you are working on, in a topmost 2D-only layer that is always as large as the frame dimensions for the current snapshot.
How do I avoid overlapping on-screen controls?
No matter what approach you choose, it helps to remember that only one of the plugins in your Motion Template should display a row of buttons on-screen. That role belongs to the object tracker, since its on-screen controls make it easier for users to access object tracking functionality. As you may recall, plugins are allowed by Final Cut Pro to display any on-screen controls based on the value of the Publish OSC parameter inside the Motion Template.If you added a watermark generator to the same Motion Template that uses an object tracker plugin, remember to turn off its Publish OSC parameter. This prevents the watermark generator from automatically adding its row of buttons to the Canvas. If your Motion Template uses other native plugins from the same FxPack, remember that those other plugins too will by default create a row of on-screen buttons. Avoid displaying multiple overlapping rows of buttons on-screen by turning off the Automatic on-screen controls for licensing, help, etc... for all but the object tracking filter:
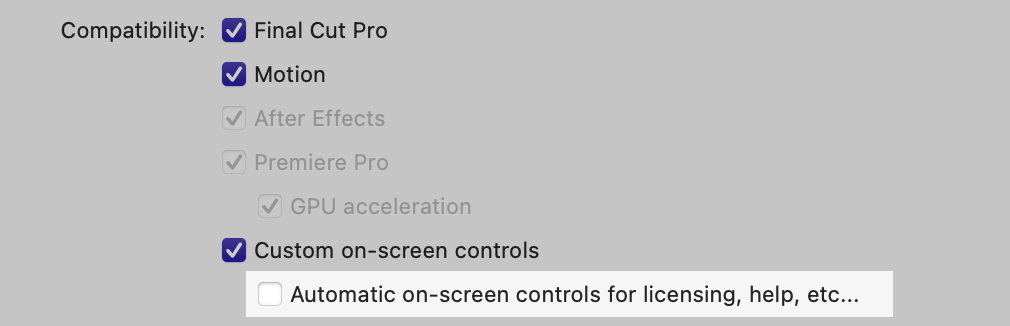
The above option should remain on only for the filter in the FxPack that hosts the object tracking parameter.
For better or worse, there is more than one way to solve the problems mentioned by this document. Each solution is dependent on how the product is structured, i.e. how many custom plug-ins are used in each Motion Template, which plug-in is providing the watermark, etc. When in doubt, contact us for assistance.
Next Steps
Once you have as many point parameters as you need, your next step is to configure the object tracker parameter.
If your goal is to use an object tracker inside a Final Cut Title template, review the documentation for the tracking opacity parameter. It is very important that the opacity of the Watermark Generator and any opaque layers above the Title Background be linked to the Tracking Opacity parameter so the watermark graphic and other overlays are excluded from the analysis phase
To ensure a better user experience in Final Cut Pro, it is also important to clean-up your Motion Templates of any redundant metadata before the product is released. This is accomplished by linking each Motion Template to the object tracker plug-in, and then clicking the Strip Metadata button available in the FxTemplates UI. This process is described in the Optimal User Experience in Final Cut Pro section of the object tracker.