Analog TV
Simulates reception and interference artifacts of analog broadcasts displayed on CRT displays.

Compatibility
Analog TV is compatible with Final Cut Pro, Motion, Premiere Pro and After Effects.

Simulates reception and interference artifacts of analog broadcasts displayed on CRT displays.

Analog TV is compatible with Final Cut Pro, Motion, Premiere Pro and After Effects.
Presets contain a snapshot of your effect configuration. 10 built-in presets are available.
When you save parameter configuration to a file on disk, this file can later be loaded to recreate the same effect configuration. Presets generated in one video application can be used by the same plug-in running in a different video application.
Working with the Presets MenuControls the shape of the surface of the simulated CRT.

Set to 50% by default.
Shows scanlines in the output. When enabled, you can configure the size and appearance of the scanlines through a number of additional parameters.

Shows underscan artifacts in the output. The Underscan Size parameter controls the height of the elements.
Underscan refers to the normally invisible portions of an analog signal that were originally used by TV sets to know when one frame ends and the next one begins.

The following options are available:
On its default setting of Start on, interference is set to immediately affect the signal. The effect alternates between periods where the image is subject to interference, and periods when the image is undisturbed.
Interference lasts for a period of time picked at random in the range defined by the On slider. Similarly, the image is left undisturbed for a period of time picked at random in the range defined by the Off slider. The random durations change every time the state changes from interference to no interference.

The Timing parameter offers the following choices:

The Offset (secs) parameter moves the start of the animation relative to the start of the clip. A positive value delays the start of the animation by the given number of seconds. A negative value moves the start of the animation before the start of the clip.
When enabled, the image is distorted sideways during periods of interference. The Amount, Smoothness and Waviness parameters let you control the strenght and appearance of the distortion.

When enabled, the image scrolls up and down within the frame during periods of interference.
The V-Sync: Count decides how many times the image will scroll up and down before settling again:

On its default range of -3 to 3 the image will scroll up or down up to 3 times before settling back to its “in sync” state. The V-Sync: Clip parameter controls whether the image scrolls up or down a precise number of times (1, 2, 3, etc…) or whether the image is allowed to scroll partially, for example sliding upwards only halfway before snapping back to its normal state.
When enabled, the image scrolls left or right within the frame during periods of interference.
The H-Sync: Count decides how many times the image will scroll up and down before settling again:

On its default range of -1 to 1 the image will scroll left or right only once before settling back to its “in sync” state. The H-Sync: Clip parameter controls whether the image scrolls left or right a precise number of times (1, 2, 3, etc…) or whether the image is allowed to scroll partially, for example sliding leftward only halfway before snapping back to its normal state.
Controls the amount of noise in the output. When its value is greater than 0, additional parameters allow you to control the size and appearance of the noise.
The Grayscale option controls whether the noise map is black and white. The Noise Brightness, Noise Contrast and Noise Saturation parameters adjust the corresponding properties in the noise map. Scale X and Scale Y parameters control the size of the noise relative to the current frame.
Enable and control animation progress through a set of parameters.
When the animation is Off, no transition in or out of the effect occurs.
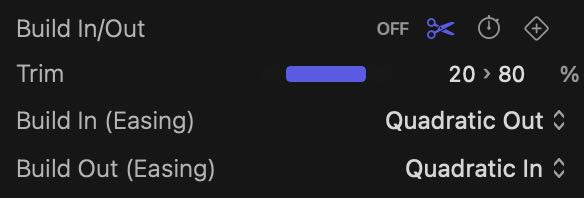
When the effect is set to build in and out by Trimming, the following parameters are displayed:

The Trim slider defines a range where the effect has been fully built. Any time outside this range is spent building the animation in or out. For example, if the Trim range is set between 20% and 80%, the effect builds in from the start of the clip up to 20% of its duration. The effects builds out from 80% to the end of the clip. If the clip were 5 seconds long, the build in and out animations last 1 second each.
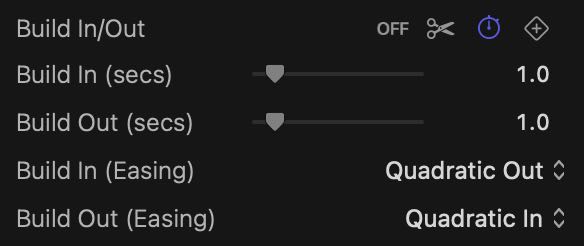
When the effect is set to build in and out through a Duration, the following parameters are displayed:

The Build In (secs) and Build Out (secs) give you an exact way to decide how long each animation should last. Should your selection not be applicable to the current clip, a warning will appear in the output. For example, if your clip lasts only 3 seconds, it would be impossible to have the build in and out animations both last 2 seconds each (as the total would be 4 seconds).
When the effect is set to build in and out through Keyframes, a single parameter is displayed:
The Build In (Easing) and Build Out (Easing) parameters let you choose the animation curve when animating by Trimming the clip or by specifying a Duration.

The Progress parameter gives complete control over the animation to you. You will need to keyframe the Progress parameter using features of the video app. Note that there are no easing options when manually animating via keyframes.
Turn this parameter on to animate the Brightness parameter.
Turn this parameter on to animate the Contrast parameter.
Turn this parameter on to animate the Saturation parameter.
Turn this parameter on to animate the Scanline Color parameter.
Turn this parameter on to animate the Amount parameter.
Turn this parameter on to animate the Smoothness parameter.
Turn this parameter on to animate the Waviness parameter.
A number that controls random aspects of the effect.
Click the button to assign a new seed value. When the seed value is changed, the effect uses a different random sequence to produce a different output.