Caption Converter User Guide
Caption Converter is an app for macOS that lets you import, export, edit and translate caption and subtitle information in the following formats: iTunes Timed Text (iTT), WebVTT (vtt), SubRip (srt), SubViewer (sub), Adobe Encore Script and Adobe Premiere Pro Markers (csv).
What’s New?
Caption Converter 1.0.1 allows you to create and edit simultaneous captions. Captions can be resized and positioned anywhere in the frame. The new features are supported when exporting to WebVTT or when burning in through Caption Burner.
Why Caption Converter?
Anyone who has worked with captions and subtitles knows that the industry has no shortage of file formats. Some are popular because they are extremely simple (e.g. SRT) but they provide little in terms of context and style information. One can theoretically use a simple text editor to generate and modify captions but the lack of error detection makes it possible to enter invalid timecodes with no warning. Importing or exporting files with the wrong encoding can turn legible text into garbage.
Caption Converter introduces a better way to work with static captions. Spot and fix problems easily. Edit, search, translate and style your captions in multiple languages. Import and export captions in a variety of popular formats.
- Better Importing. Automatic detection of file format and text encoding to handle files created on Windows.
- Better Exporting. Quickly export files for multiple languages and/or multiple frame rates from a single document. Exclude markup information from individual export operations when text formatting is unsupported by the destination device or web video platform.
- Better Translation. Compare two languages by viewing them side by side. Select a caption in one language to jump to all matching captions in the second language.
- Better Error Detection. Overlapping captions are detected automatically, helping you identify and fix mistakes in your input data.
- Better Editing. Filter captions by keywords. Enter a timecode to search for all captions near that time. Split and join captions. Assign basic text styles that are supported by popular format like iTunes Timed Text and WebVTT.
- Better Storage. Captions are stored in a new container file format that supports multiple versions of your captions in different languages.
Known Limitations
Caption Converter does not support vertical writing systems. Caption Converter does not let you edit or create continuous (roll-on) captions. Captions with non-overlapping time periods are supported by all file formats. Simultaneous captions are only supported by WebVTT. Captions are said to be simultaneous (or overlapping) when the time periods defined by their in/out timecodes overlap. Text styles, colors and alignment are not supported by all file formats. For a list of limitations specific to a given file format, please refer to the formats section.
When using the trial version of Caption Converter, only the first 10 captions in a language will be exported. Purchase Caption Converter to unlock the full version and remove this restriction.
Quick Start
Import captions from an existing file by one of these methods:
- Drag the file over Caption Converter’s app icon, whether it sits on the Dock or in the Applications folder.
- If the Caption Converter app is already running, drag the file over Caption Converter’s main window.
- Click the button in Caption Converter’s main window.
- Select the command under the menu.
If the conversion process completes without errors, Caption Converter displays a new document window to display the captions imported from the file. Click the button to export captions to one of the other formats supported by Caption Converter.
User Interface In Depth
When you import or open a file in Caption Converter, a document window is displayed:
Working With Timecodes
Caption Converter displays all timecodes in the SMPTE notation, using colons as delimiters for non-drop frame mode (HH:MM:SS:FF). When drop frame mode is enabled for NTSC frame rates, the last component in the timecode is separated by a semicolon (HH:MM:SS;FF).
When entering timecodes, remember that components on the right take precedence. For example the timecode "2:30:02" translates to 2 minutes, 30 seconds and 2 frames. When entering an invalid frame number, Caption Converter will automatically adjust it to be within the range allowed by the current frame rate. For example, timecode "1:10:28" is automatically adjusted to "1:10:23" if the current frame rate is 24fps, since this only allows frame numbers from 0 to 23.
Timing Options
Options available under the Timing section are global: they affect all captions and all languages in the file.
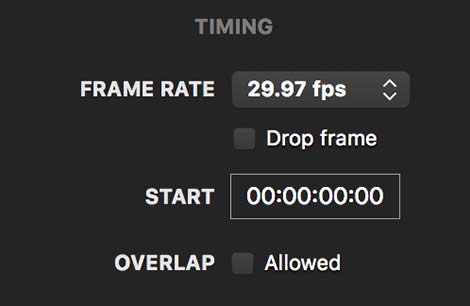
- The Frame rate option affects how timecodes are displayed. It also affects the rules for altering existing timecodes or entering new ones. Change the frame rate to best match the project and data you are working with. Changes to the frame rate are non-destructive and do not cause any retiming problems. You can also choose one frame rate for editing and an entirely different one for exporting.
- The Drop frame option lets you switch to and from the SMPTE drop-frame mode for Broadcast NTSC frame rates: 29.97fps and 59.94fps. Please note some important side effects of turning on drop frame mode:
- Timecodes are displayed according to the rules of this standard. Any timecodes you enter are similarly expected to follow the rules defined by the standard.
- Enabling or disabling drop frame mode can cause captions to shift forward or backward by small amounts, when timecodes are edited. This is due to the nonintuitive and peculiar rules behind the drop-frame standard. You are not required to turn on drop-frame mode simply because you are expected to export captions in that standard. The export window gives you a chance to enable drop frame mode in its own UI, as a single-shot option that only affects the exported captions.
The Start timecode defines a global offset that applies to all captions. For example, a start time of 2:00:00 means that all captions are considered relative to the 2 minute mark on the timeline. In the same scenario, a caption that is set to start at 1:12 (1 second, 12 frames) will in fact start at 2:12:12.
This value is imported from iTunes Timed Text files, and few other file formats have a native concept of a global time offset. Its usefulness should be clear during export operations, since it allows you to shift all captions forward or backward in time without requiring you to manually adjust every timecode. A huge time saver!
The Overlap option allows captions to have overlapping time ranges, so that one or more captions may appear simultaneously on screen. By default the Allow button is off because many popular formats do not allow captions to appear simultaneously on screen. Two captions are said to be overlapping when the time period represented by their in/out timecodes intersects. Turn Allwed on to allow captions to have overlapping time ranges. This can be useful when multiple characters on screen are speaking at the same time, and you would like to create separate captions for each voice. Simultaneous captions can be exported to WebVTT, or burned in through the Caption Burner plug-in.
Appearance Options
Options under the Appearance section affect all selected captions: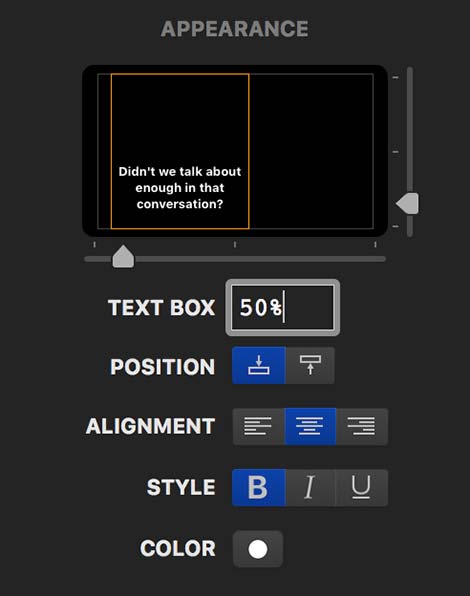
A preview canvas provides a quick glance at how the caption might appear within the frame, according to the options selected below.Text formatting options will apply to entire captions, or only to the selected text within a caption.
- The Text Box option lets you choose the size of the area where caption text will be rendered, relative to the width of the frame. A value of 100% means that the text can occupy the entire width of the frame. A value of 50% means the text will be at most half as wide as the entire frame. It then becomes possible to position the text box relative to the frame by using the horizontal slider below the preview image, or by clicking and dragging directly within the preview. The Text Box option allows you to position a caption directly below a character’s face, and it is generally required when working with simultaneous captions.
- The Position option controls the general location of the caption within the frame. iTunes Timed Text only supports captions in the top or bottom regions of the frame. The WebVTT specification allows for greater flexibility. You can fine tune the vertical position of the text by using the vertical slider to the right of the preview image, or by clicking and dragging over the preview image itself. Please note that many text-based caption file formats, such as SRT, do not support any relative positioning of captions within the frame.
- The Alignment option affects the relative alignment of text within its enclosing box. iTunes Timed Text does not support this option, and neither do most text-based caption file formats. Caption Converter currently provides this option for output to WebVTT.
- The Style option allows you to apply basic text styles to any selected text, or to all selected captions at once. Remember to select portions of the caption text if you want a specific style to affect specific words or characters rather than the entire caption. Styles are supported by iTunes Timed Text, WebVTT and by a number of text-based formats through the inclusion of HTML-style tags in the output.
- The Color option lets you pick a color for any selected text. Colors are supported by iTunes Timed Text, WebVTT and by a number of text-based formats through the inclusion of HTML-style tags in the output. As for the Style options above, remember to select portions of the caption text if you want to change the color of specific words or characters rather than the entire caption.
Working With Captions
The main section of each window exposes features to work with captions and languages. Let us focus on captions first:
- The button allows you to create a new caption. If a caption is currently selected, a new caption is created below it. When no captions are selected, the new caption is inserted at the end of the list, after all existing captions for the current language.
- The button deletes all selected captions. The button is not available when the list is empty or if no captions are currently selected.
- The button lets you display global preferences that let you customize certain behaviors of the user interface. For example, you can define what happens after editing the in or out timecodes of a caption, or define a time range when searching for captions by timecode.
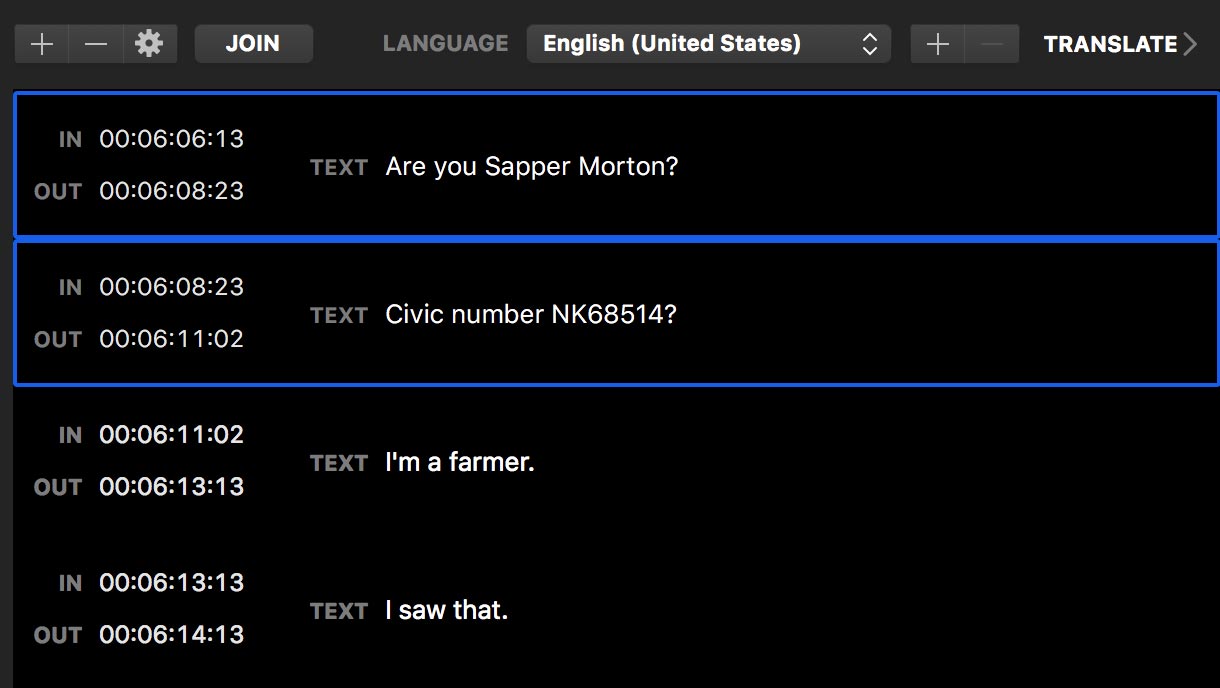
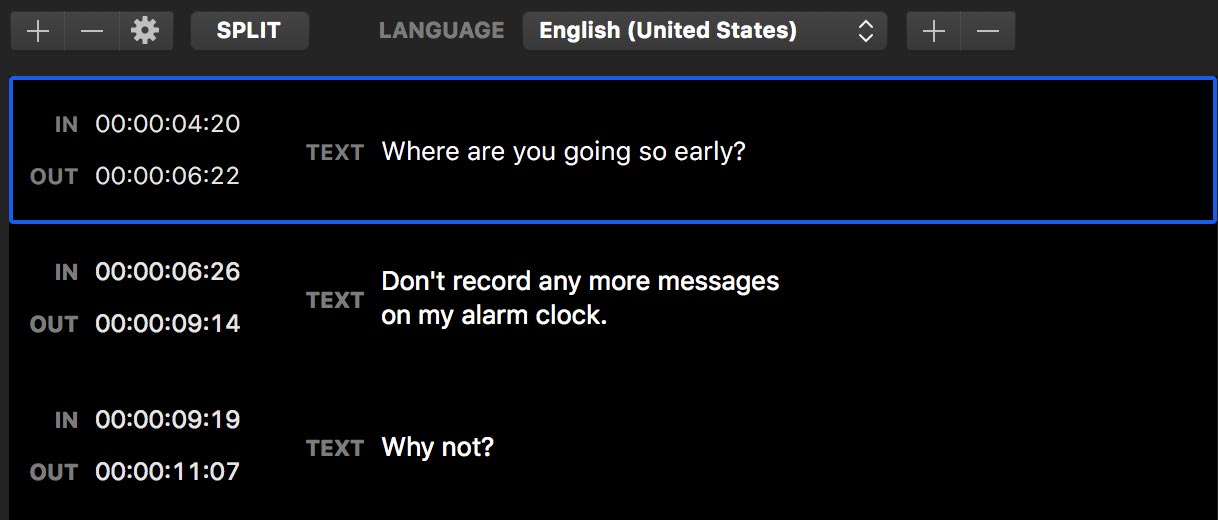
- The button is available when exactly two captions are selected. Clicking this button causes the two captions to be merged into a single caption. Text from both captions is merged on multiple lines. The in timecode for the merged caption will be the same as the in time for the first caption. The out timecode will be the same as the second caption being merged. The end result is to have a single caption that is displayed on screen for the same duration as the previous two captions:

- The button is available when a single caption is selected. Clicking this button causes the single caption to be split in two, with the first line of text being assigned to the first caption and subsequent lines of text assigned to the second caption. The duration of each caption will be exactly half of what the original caption was. Only captions that span multiple lines of text can be split.
To edit a caption’s text, click, select and type as you would in a normal text editor. The user interface allows for up to 4 lines of text to be previewed. We recommend that no caption use more than 2 lines of text. This is both a strict requirement for exporting to iTunes Time Text and good practice to follow. The readability of your captions on any device and display suffers when more than 2 lines are presented at once.
Searching Captions
Below and to the left of your captions, you will find a search box that supports text- and timecode-based searches:
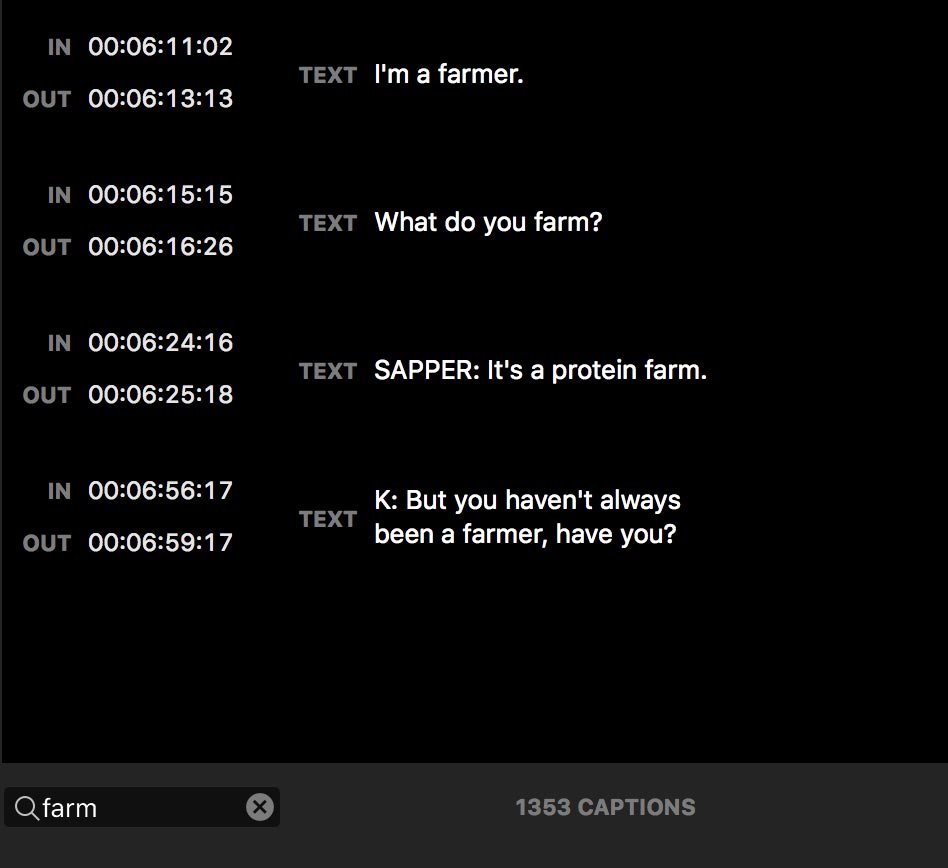
When you enter one or more keywords in the search box, all captions that contain any of those words will be displayed.
You can also search for captions by entering a timecode:
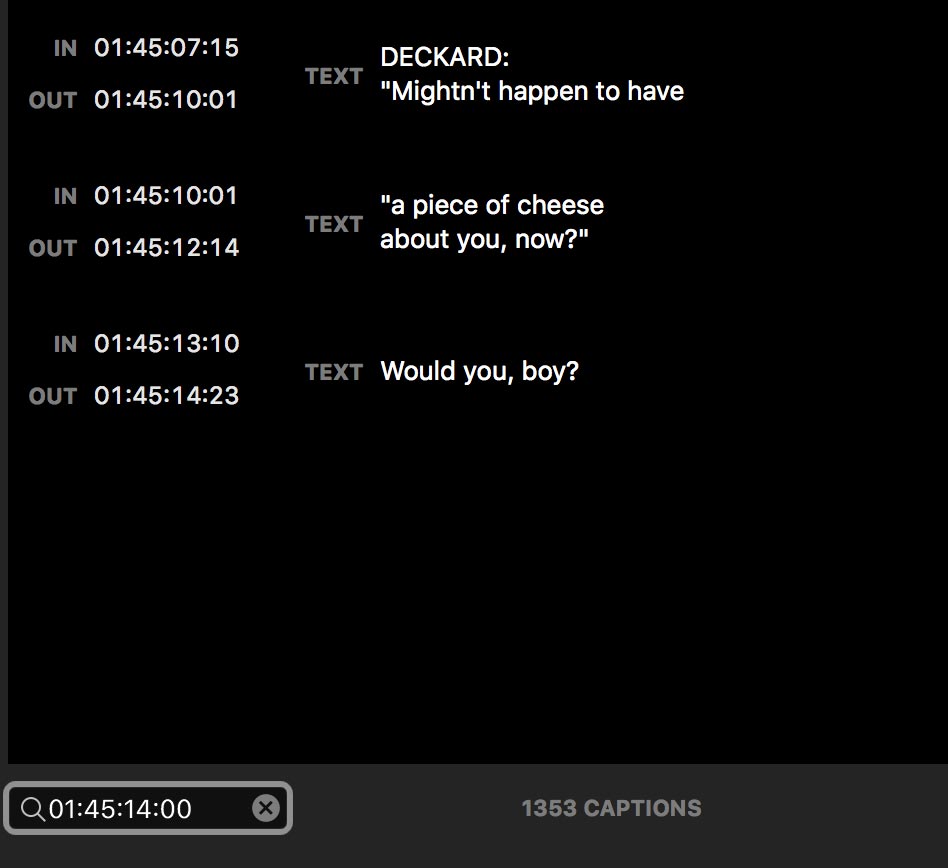
All captions that appear near that timecode will be displayed. By default, captions that appear 5 seconds before or after the given time are matched. You can set a different range through the program’s preferences.
Finding and Fixing Problems
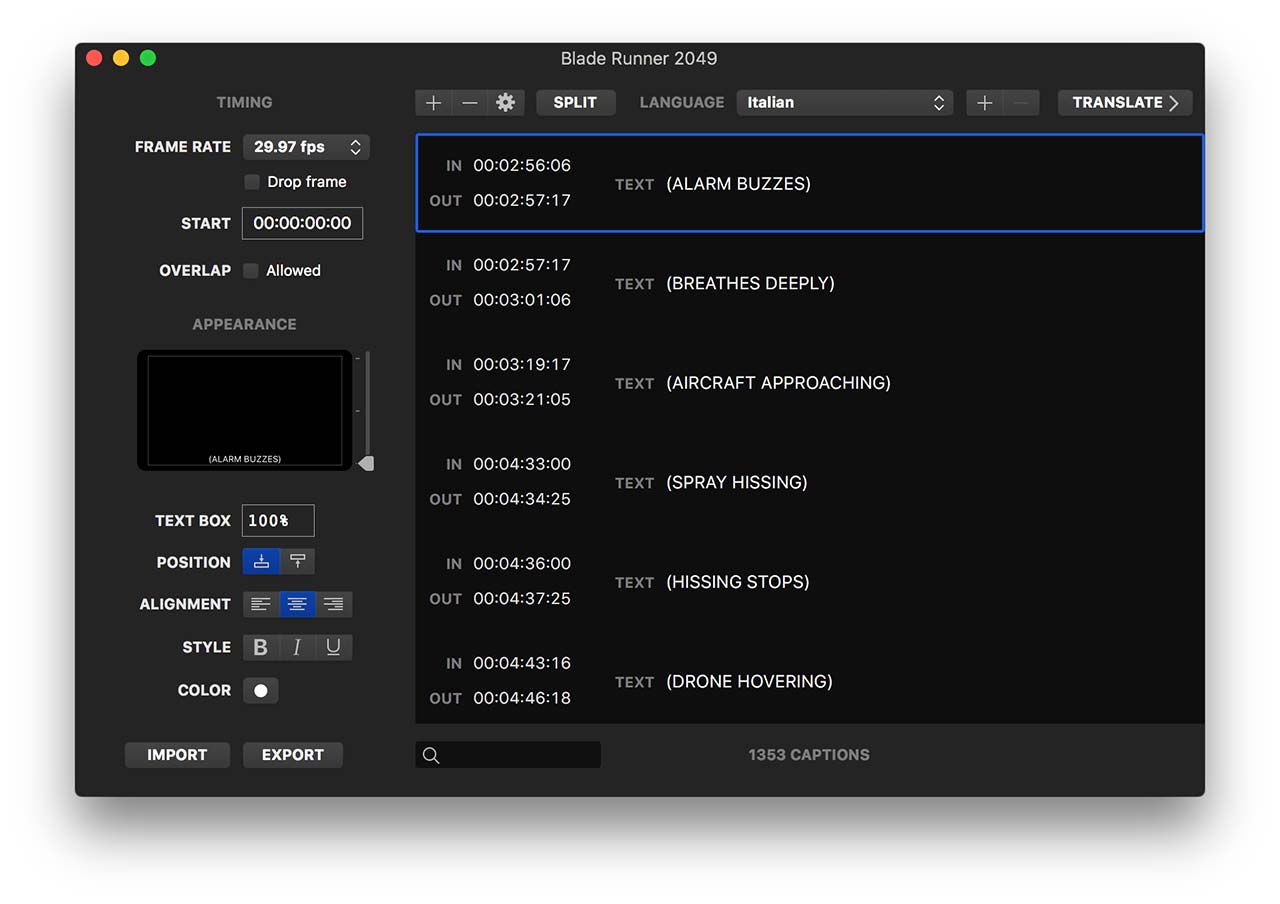
Caption Converter automatically detects when two or more captions are set to appear simultaneously during playback. These timings conflicts are highlighted in the user interface:
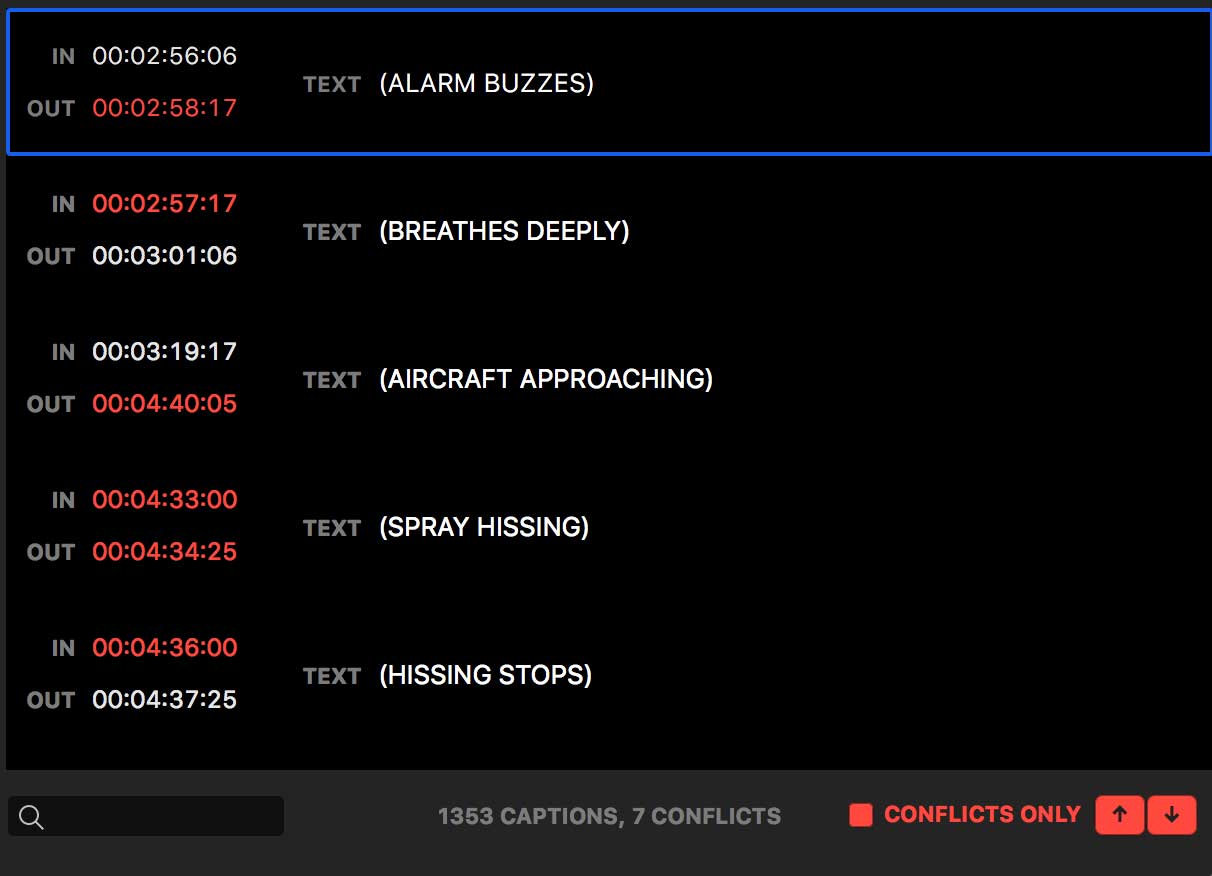
In the example above, a value of "3" was entered by accident when a value of "2" was intended. The result of this mistake is that the first caption overlaps the next two captions in the current language. Changing the out timecode of the first caption to 2:57:17 would fix the problem.
When the imported data contains multiple conflicts, you can enable the Conflicts Only option to temporarily display only captions that have pending issues to be resolved.
The buttons let you jump to the previous and next caption with problems. For quick navigation, the keyboard shortcut for these buttons is the Option/alt key followed by the up or down arrow on your keyboard.
Working With Multiple Languages
Every document in Caption Converter can contain multiple languages. This makes it easier to manage multiple translations for the same media.
When creating a new document, the current system locale is used to create a default language, i.e. "English (United States)". When importing an existing file, match the language to that of the captions being imported. For example, when importing a SubRip (.srt) file containing German language subtitles, it makes sense to store those captions as "German".
To add a new language to an existing document, click the button to the right of the Language menu. Similarly, click the button to delete a language and all associated captions from the document.
Translation
When creating a new language, Caption Convert will offer to duplicate the existing subtitles to the new language. This is a common technique for anyone who embarks on a translation effort.
Caption Converter goes a step further to make translation easy. Click the button to reveal a second, side-by-side view where you can load a reference language (your source for the translation):
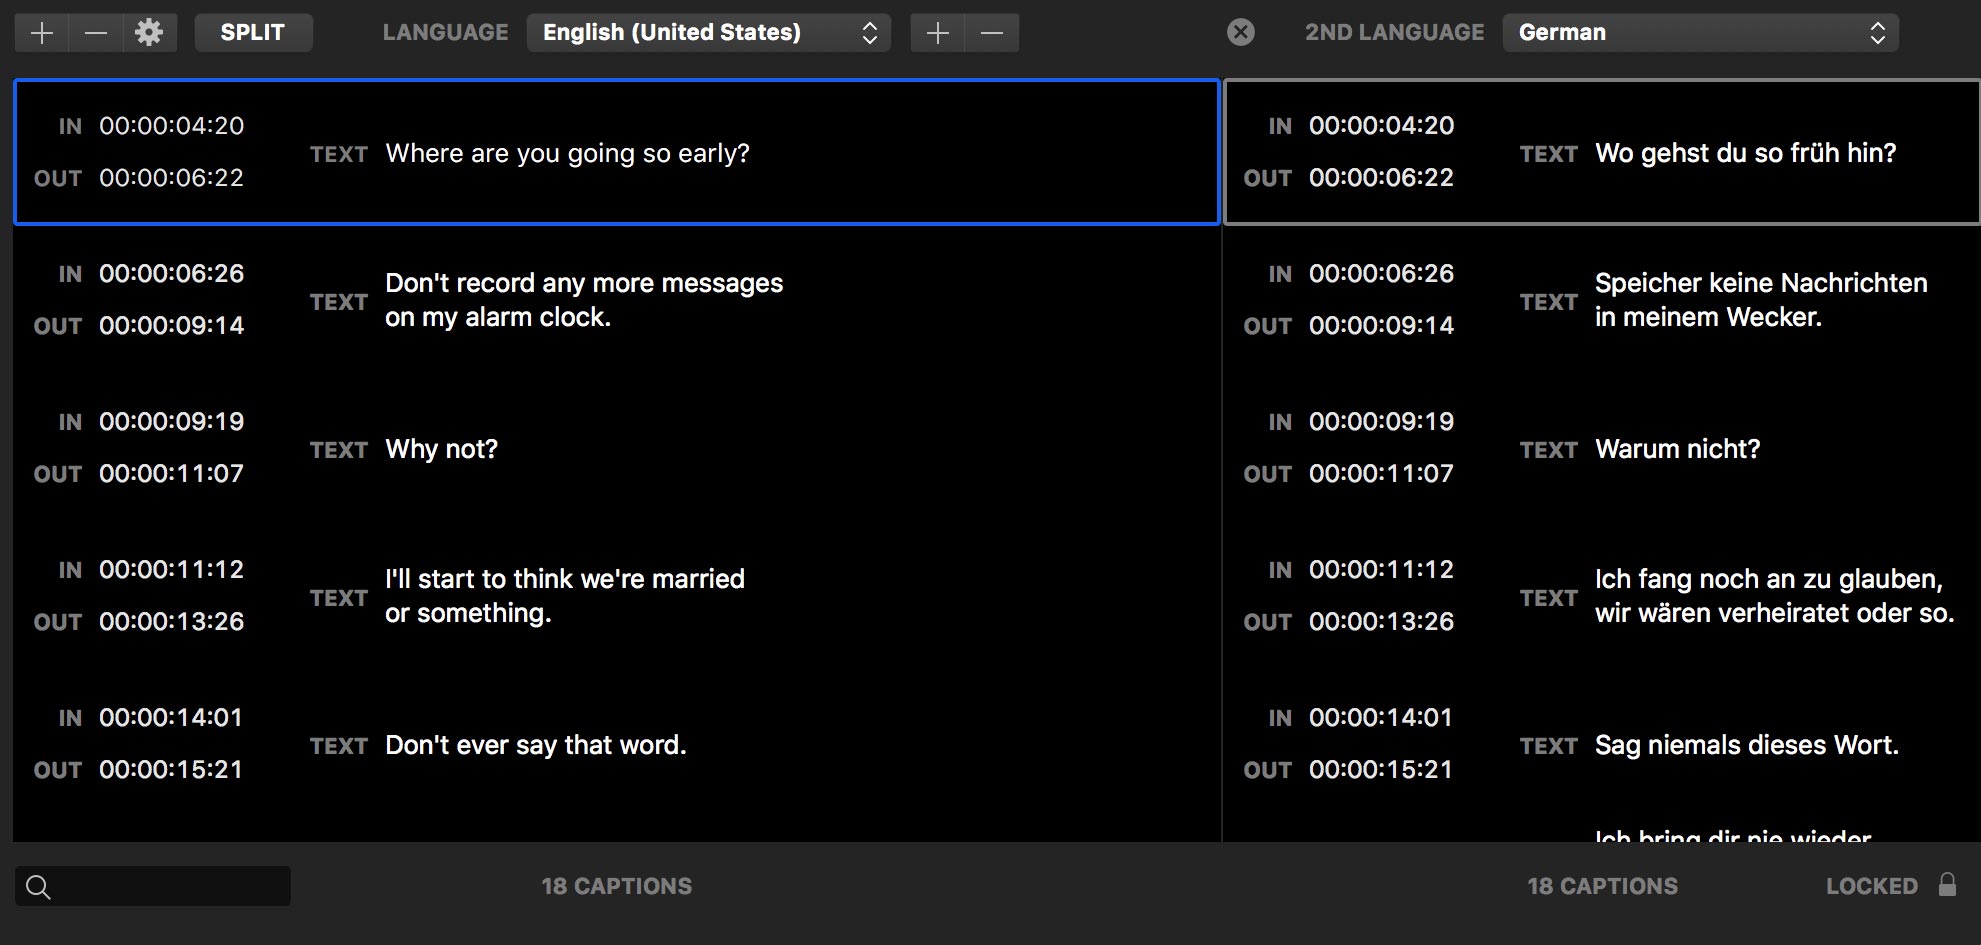
Load your source language on the right side (the reference view) and work on the translation on the left (the primary view).
Click on a caption in one language to find its nearest equivalent in the other language. This allows you to identify the caption(s) that match a given timecode, and help you verify the correctness of the translation.
Languages are not required to have the same number of captions or the same timecodes. Translators have complete freedom in using more or less captions, and at different timecodes, to translate the underlying material.
Only captions and timecodes on the left-view can be changed. Text and timecodes in the right view are locked. They can only be selected and copied.
Importing
The import process begins when you open an existing file, or when you click the button in a document window.
Certain file formats provide enough information to Caption Converter as to be readable directly, with no user intervention. Such is the case for iTunes Timed Text files. All other formats may require you to fine-tune the import process through this window:
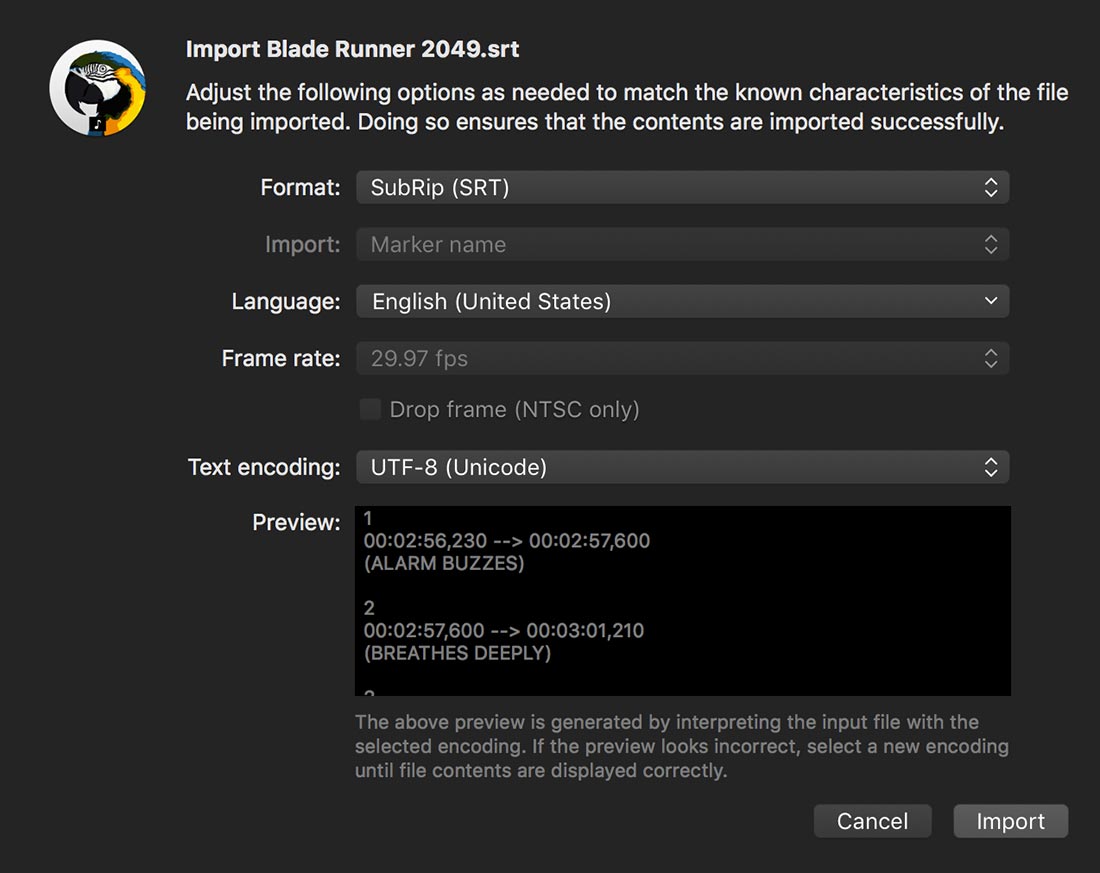
Caption Converter always guesses the most likely settings for the given file. In most cases, you only job when importing will be to match the language to the contents of the file.
- The Format menu lets you pick one of the file formats supported by Caption Converter. This format instructs the import process on how to interpret the file contents. As for most options in the Import window, this is automatically guessed from the file extension and contents of the file. In most cases it will not be necessary to change the initial selection.
- The Language menu lets you select among hundreds of languages and regions used across the world. Match the language and region selection to the contents of the file. For example: when importing Japanese captions, select Japanese. When importing German subtitles meant for Swiss viewership, select German (Switzerland). etc.
- The Frame rate menu lets you select a frame rate when importing from files that use SMTPE timecodes, such as Adobe Encore Script. These file formats use frame numbers in their timecodes but fail to declare what range of frames was used (0 to 23 for 24fps, 0 to 29 for 30fps, etc.)
In these cases, it is very important that you match the frame rate to the known frame rate used to generate the source file. If the source file was known to use drop frame timecodes, enable the Drop frame (NTSC only) option as well. This option is only available for Broadcast NTSC frame rates: 29.97fps and 59.94fps. - The Text encoding option lets you choose how the contents of the text file are to be interpreted. In more recent times, files are encoded using one of several Unicode standards (UTF-8, UTF-16) to ensure that characters and glyphs in any language can be represented. Unfortunately a large number of captions are still available in files that use text encodings specific to a family of languages (e.g. Western European languages) or single languages (Japanese). Caption Converter tries to automatically detect the text encoding used to save the input file. A Preview is available to check the contents of the file as interpreted through the given encoding. If the preview looks incorrect, switch to a different encoding until the contents of the file are read correctly.
WebVTT
When importing WebVTT files, the following UI is visible under the Format menu:
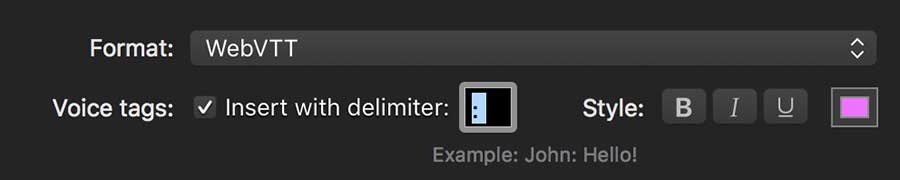
The extra options give you control over any voice tags found in the source file:
- The Voice Tags: Insert with delimiter option lets you convert any voice tags to caption text during the import process.
- The delimiter is a series of characters used to separate voice identifiers from the caption text.
- The style options affect the voices only, allowing you to make them bold, italic and/or underline, and to assign a custom color.
For example, when using the default delimiter of ": " with the bold option enabled and the color set to cyan, the WebVTT cue:
<v John>Hello!<v>
John: Hello!
Adobe Premiere Pro Markers
When importing Premiere Pro Markers files, the following UI is visible under the Format menu:
- The Import menu is only available when importing Adobe Premiere Pro markers stored in CSV files. It lets you pick whether you with to import caption text from the marker’s name, comments or both.
Exporting
The export process begins when you click the button in a document window. Export options are available inside a standard macOS Save sheet:
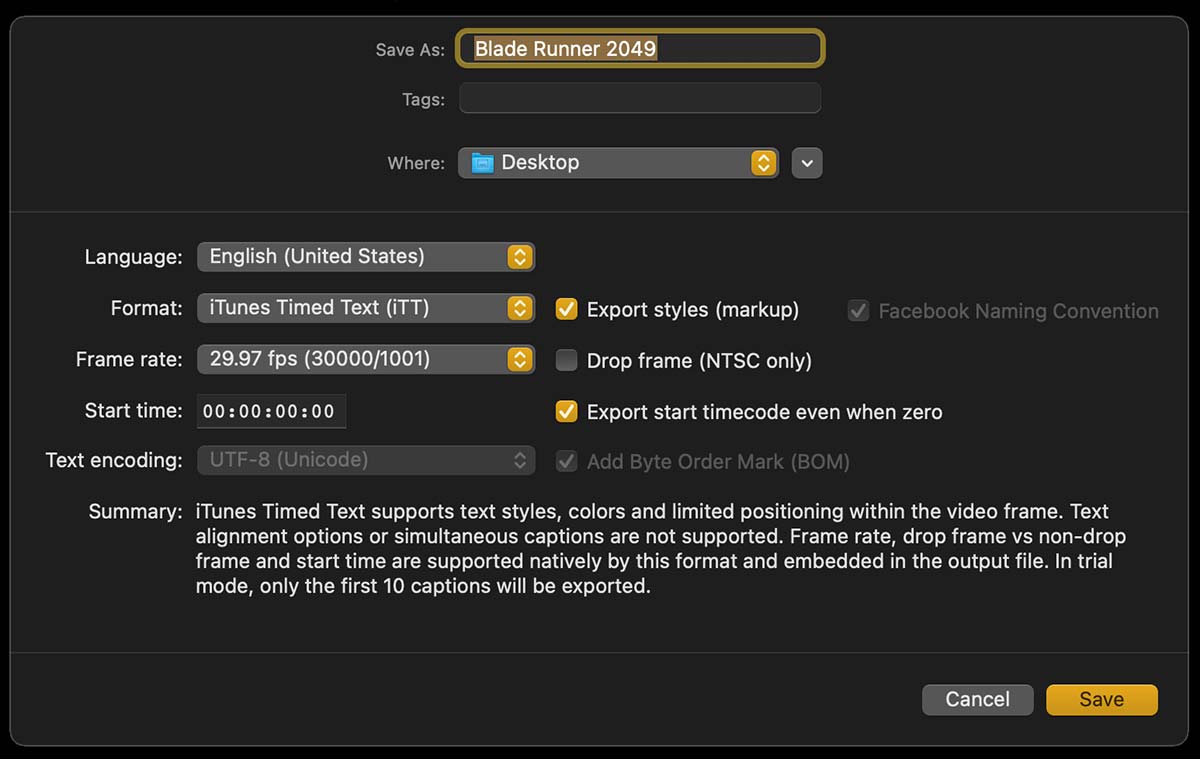
The options you choose at this stage only affect the export process. The original captions and document options are left untouched during an export. This allows you to quickly perform a series of export operations at various output settings. For example, you might want to output a series of iTunes Timed Text files at various frame rates, or to create drop frame and non-drop frame versions of the same captions.
- The Language menu lets you select one among all languages currently stored in the document. A single Caption Convert document may contain multiple languages, so your first job is to select which language to generate the output file for.
- The Format menu lets you choose the file format to save your data into. Every file format has different characteristics, so the Summary at the bottom of the window is meant to provide a quick review.
- If the output file format supports text styles, you can choose to include those styles by enabling the Export styles (markup) option. When you omit text styles, all captions are exported as text only, regardless of the features supported by the file format. When exporting to YouTube, remember to export without markup as required by their platform.
- When exporting a SubRip (SRT) file for Facebook, enable the Facebook Naming Convention option to have the correct language suffix appended to your filename. For example, if your filename is "Demo" and it contains English subtitles for the United States, the filename exported by Caption Converter becomes
Demo.en_US.srt. This option is not available when exporting to formats other than SubRip. - The Frame rate menu lets you pick a desired frame rate for the exported timecodes. This option is only available for file formats that use SMPTE timecodes, i.e. iTunes Timed Text and Adobe Encore Script. As with all other export options, changing the frame rate at this stage does not affect the data in your document. Enable the Drop frame option if you want the timecodes to be generated using the SMTPE drop frame notation for NTSC broadcast frame rates (29.97fps and 59.94fps).
- The Start time timecode lets you offset all exported timecodes by the same value. This may be useful when extra content has been added at the beginning of the media, since you can quickly offset all captions by the required time without having to edit any timecodes. As an example, if you enter a Start time of 2:30:00 and your first caption starts at 1:00 (one second) the actual exported timecode for the first caption will be 2:31:00.
- The Text encoding menu lets you select one of the common encodings used to transfer text files across computers. This option is disable for some formats, like iTunes Timed Text and WebVTT, that require files to be in a specific flavor of Unicode (UTF-8). When exporting to other text-based formats, it may make sense to select an encoding that is known to be supported by the software that will be used to read and display your captions. Many such programs still use one of the legacy Windows codepages corresponding to one or more languages.
- When exporting to Unicode (UTF-8 or UTF-16) the Add Byte Order Mark (BOM) option lets you decide if you want the output file to contain a special, invisible character sequence that instructs other software on how to interpret the contents of the file correctly.
Formats
iTunes Timed Text
iTunes Timed Text (iTT) is a subset of the Timed Text Markup Language by the World Wide Web Consortium (W3C). All iTT documents are TTML documents that use the restricted subset of TTML. iTunes Timed Text is natively supported by Final Cut Pro 10.4 (or later). iTT files store all timecodes in the SMTPE format, with a distinction between drop frame (HH:MM:SS;FF) and non-drop frame (HH:MM:SS:FF) timecodes.
When Importing iTunes Timed Text...
Caption Converter understands the majority of information encoded in iTT files, and will faithfully import captions in the language, style and timing stored in the file.
When Exporting iTunes Timed Text...
Most of the information you can manipulate in Caption Converter is faithfully exported to an iTT file, with a few important exceptions. The iTT specification does not allow for simultaneous captions (i.e. captions whose time periods overlap). iTT does not support text box sizing and placement. iTT does not allow you to customize text alignment, since all captions are centered within the frame.
WebVTT
WebVTT is an evolving standard by the World Wide Web Consortium called The Web Video Text Tracks Format. Caption Converter supports a limited but growing subset of the specification that deals with static captions. Specifically, Caption Converter supports:
- Bold, italic and underlined text via HTML-like syntax.
- Text colors found in STYLE sections.
- Voices identified through HTML-like tags can be inlined during the import process. For example, the caption:
can be imported as:<v John>Hello!<v>John: Hello!
When Importing WebVTT...
Caption Converter will recognize text styles defined inline via HTML-style syntax, and text colors as defined via CSS-like statements in STYLE sections. Voices can be inlined into captions or skipped, based on the options provided for the import process. All other information is skipped.
When Exporting WebVTT...
All of the caption information you can manipulate in Caption Converter is faithfully exported to WebVTT. Text styles are exported via inline HTML-style syntax. Text colors are exported by creating STYLE sections. Text alignment, text box size and relative positioning within the frame are also exported via Cue attributes.
SubRip (SRT)
SubRip (SRT) remains the most popular text-based caption file formats, despite having no formal specification and limited support for text formatting via HTML-like syntax. SubRip files use their own format for timecodes (00:00:00,000) where the last component represents milliseconds.
When Importing SubRip (.srt)...
Caption Converter imports text styles and colors with appropriate HTML-like syntax.
When Exporting SubRip (.srt)...
Caption Converter exports text styles and colors via HTML-like syntax. Simultaneous captions, text alignment options, text box size and positioning are not supported by the specification. Make sure that you export your file as UTF-8 when targeting YouTube, Facebook or other popular social media platforms. In some cases it also helps to export files without markup (text formatting) to guarantee the best results. You can export captions without markup by turning off the Export Styles (markup) option in the Export window.
SubViewer (SUB)
SubViewer is a text-based file format that does not support any appearance options or simultaneous captions. It is still popular with a number of software packages and web video platforms, such as YouTube. SubViewer files use their own format for timecodes (00:00:00.00) where the last component represents hundredths of a second.
When Importing SubViewer (.sub)...
Caption Converter imports only caption text.
When Exporting SubViewer (.sub)...
Caption Converter exports only caption text.
Adobe Encore Script
Adobe Encore support both Text and Image-based subtitles. Caption Converter allows you to import and export Text Script files. The file format is extremely simple. Timecodes use SMTPE-like components (HH;MM;SS;FF) but no distinction is made between drop vs non-drop timecodes.
When Importing Adobe Encore Text Script...
Caption Converter imports only caption text.
When Exporting Adobe Encore Text Script...
Caption Converter exports only caption text. Make sure that you export the file in one of the Unicode formats (UTF-8 and UTF-16) to ensure that text in all languages is correctly preserved. The use of a Byte Order Mark is optional.
Adobe Premiere Pro Markers (CSV)
Adobe Premiere Pro allows you to export markers in XML and CSV files. Caption Converter currently allows you to import CSV files only. Premiere Pro uses SMPTE-like notation for its timecodes, distinguishing between non-drop frame (HH:MM:SS:FF) and drop-frame mode (HH;MM;SS;FF). The "csv" file extension suggests that file contents should always be comma-separated values. In practice, recent versions of Premiere Pro seem to export tab-separated values instead. Caption Converter detects and handles either variant automatically.
When Importing Adobe Premiere Pro Markers...
Caption Converter imports only caption text. Make sure to match the Drop frame setting to the value expected in the file. The import process will fail if your selection does not match the data in the file. While markers do not have any associated text formatting, Premiere Pro allows users to enter both a name and arbitrary comments for each marker. Caption Converter allows you to import marker name, comments, or both, via a setting in the import window. When importing name and comments, the name is imported as the first line in the caption and the comments are imported in subsequent lines.
When Exporting Adobe Premiere Pro Markers...
Caption Converter does not support exporting to this format. Premiere Pro allows the importing of markers saved in the Final Cut Pro XML Interchange Format which predates Final Cut Pro X. Let us know if you are looking forward to having it as an option.