Levels

A color adjustment that lets you define a new output range for existing color information. This effect can be used to decrease contrast, lighten shadows, darken highlights, etc.

This effect was designed to give you similar functionality to what is available in image retouching programs such as Adobe® Photoshop®.

This plugin has been completely redesigned in FxFactory Pro 6 to support advanced source and mask selection, chromatic aberration and animatable parameters.

The user interface encourages progressive discovery of the large number of features. Built-in presets offer shortcuts to popular styles and techniques. Master advanced techniques once and apply them to other plugins that share the same design.

Compatibility

Levels is compatible with Final Cut Pro, Motion, Premiere Pro and After Effects.

Parameters

Presets

Presets contain a snapshot of your effect configuration. 5 built-in presets are available.

When you save parameter configuration to a file on disk, this file can later be loaded to recreate the same effect configuration. Presets generated in one video application can be used by the same plug-in running in a different video application.

Working with the Presets Menu

Preview

This parameter enables a canvas preview of the pixels selected through the Source and Mask parameter sections.

Previewing the Source and Mask

Levels

Channels

The following options are available:

Low

Adjusts shadows, i.e. the darkest pixels in the image. Raising this value has the effect of making shadows in the image appear lighter. When adjusting each channel separately, you will see separate sliders in the inspector Low 1, Low 2, Low 3 and Low 4, as needed. When adjusting levels in the RGB color space, a separate Low Alpha adjustment is also available to modify the alpha channel.

Mid

Adjusts Midtones, i.e. pixels that sit between black and white in the brightness range. Moving this value towards 0% will make the output darker. Moving it towards 100% will make the output lighter. When adjusting each channel separately, you will see separate sliders in the inspector Mid 1, Mid 2, Mid 3 and Mid 4, as needed. When adjusting levels in the RGB color space, a separate Mid Alpha adjustment is also available to modify the alpha channel.

High

Adjusts highlights, i.e. the lighest pixels in the image. Lowering this value causes highlights to appear dimmer. As the output range becomes smaller than the input range, this effect allows you to reduce contrast. When adjusting each channel separately, you will see separate sliders in the inspector High 1, High 2, High 3 and High 4, as needed. When adjusting levels in the RGB color space, a separate High Alpha adjustment is also available to modify the alpha channel.

Source

Parameters in this section allow you to choose a set of pixels to apply the effect to, based on a number of techniques:

  • Luminance Range: select a range of pixels based on their brightness.
  • Color Key: select a range of pixels through a keying algorithm.
  • Edges: select pixels according to an edge detection algorithm.
  • Person Contour: select the main subject in the video frame through an AI-assisted algorithm. Works best with human subjects.
  • Object Tracker: select pixels by tracking one or more objects across the frame.
  • Face Detection: select pixels by detecting the location of human faces and tracking them across the frame for the duration of the clip.

Choosing Source Pixels

Original (left), selecting the darkest pixels (center) and lightest pixels (right)

Original (left), selecting the darkest pixels (center) and lightest pixels (right)

Mask

Parameters in this section define a shape used to crop the output of the effect with. When using an object tracker or face detection, the same mask shape is replicated for each object or face that appears in the frame.

  • Off: no cropping occurs.
  • Rectangle: crop the output to a rectangular shape.
  • Oval: crop the output to a circular shape.
  • Gradient: crop the output to a linear gradient.
  • Bar: crop the output to a two-sided gradient.
  • Custom: crop the output to a shape defined by a custom graphic.
  • Text: crop the outut to a shape defined by a title.

Choosing a Mask

Rectangular mask (left), gradient (center), gradient mixed with Person Contour (right)

Rectangular mask (left), gradient (center), gradient mixed with Person Contour (right)

Relative to Face/Object

Off by default.

Chromatic Aberration

Parameters in this section allow you to apply color distortions inspired by lens geometry, but with greater artistic range.

Using Chromatic Aberration

Original (left), distortion of the red and blue channels (center) and of chroma (right)

Original (left), distortion of the red and blue channels (center) and of chroma (right)

Animation

This section allows you to animate effect parameters over time.

Build In/Out

Build In/Out lets you enable and control animation progress.

When the animation is Off, no transition into or out of the effect occurs.

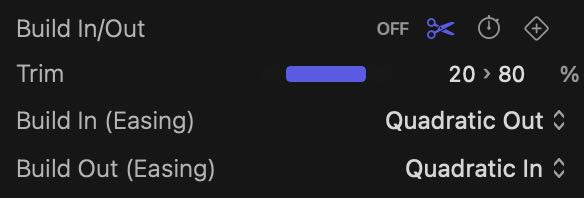
When the effect is set to build in and out by Trimming, the following parameters are displayed:

The Trim slider defines a range where the effect has been fully built. Any time outside this range is spent building the animation in or out. For example, if the Trim range is set between 20% and 80%, the effect builds in from the start of the clip up to 20% of its duration. The effects builds out from 80% to the end of the clip. If the clip were 5 seconds long, the build in and out animations last 1 second each.

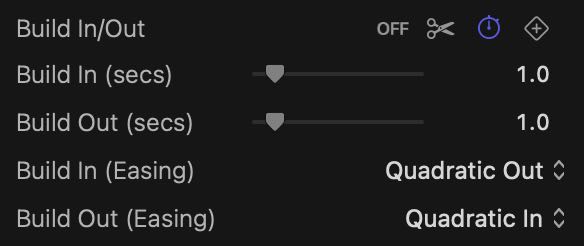
When the effect is set to build in and out through a Duration, the following parameters are displayed:

The Build In (secs) and Build Out (secs) give you an exact way to decide how long each animation should last. Should your selection not be applicable to the current clip, a warning will appear in the output. For example, if your clip lasts only 3 seconds, it would be impossible to have the build in and out animations both last 2 seconds each (as the total would be 4 seconds).

When the effect is set to build in and out through Keyframes, a single parameter is displayed:

The Build In (Easing) and Build Out (Easing) parameters let you choose the animation curve when animating by Trimming the clip or by specifying a Duration.

The Progress parameter gives complete control over the animation to you. You will need to keyframe the Progress parameter using features of the video app.

Aberration Amount

Off by default.

Turn this parameter on to animate the Amount value specified under the Chromatic Aberration section. A number of standard controls allow you to control the animation:

Aberration Amount Animation


Animating the Aberration Amount with Directional (left) and Radial (right) Fringing

Seed

A number that controls random aspects of the effect.

Click the New button to assign a new seed value. When the seed value is changed, the effect uses a different random sequence to produce a different output.