Funhouse Mirror

Applies a distortion along a line that cuts across the video frame to simulate the effect of a curved mirror.

This plugin has been completely redesigned in FxFactory Pro 6 to support advanced source and mask selection, chromatic aberration and animatable parameters.

The user interface encourages progressive discovery of the large number of features. Built-in presets offer shortcuts to popular styles and techniques. Master advanced techniques once and apply them to other plugins that share the same design.

Compatibility

Funhouse Mirror is compatible with Final Cut Pro, Motion, Premiere Pro and After Effects.

Parameters

Presets

Presets contain a snapshot of your effect configuration. 8 built-in presets are available.

When you save parameter configuration to a file on disk, this file can later be loaded to recreate the same effect configuration. Presets generated in one video application can be used by the same plug-in running in a different video application.

Working with the Presets Menu

Preview

This parameter enables a canvas preview of the pixels selected through the Source and Mask parameter sections.

Previewing the Source and Mask

Funhouse Mirror

Size

Set to 25% by default.

Angle

Set to by default.

Origin

A point parameter centered in the frame by default.

Initial location in the frame

While it is possible to change the X and Y coordinates via the inspector, it is far easier to interact with point parameters directly on-screen:

Adjusting Point Parameters in Final Cut Pro
Adjusting Point Parameters in Motion
Adjusting Point Parameters in Premiere Pro
Layer Selection in After Effects

Origin: Rig

When Source is configured to use an object tracker or face detection, this parameter lets you rig the orgin of the effect to one of the objects being tracked, or one of the faces detected in the video.

Scale

Set to 0.5 by default. Only values between -1 and 1 are allowed.

Source

Parameters in this section allow you to choose a set of pixels to apply the effect to, based on a number of techniques:

  • Luminance Range: select a range of pixels based on their brightness.
  • Color Key: select a range of pixels through a keying algorithm.
  • Edges: select pixels according to an edge detection algorithm.
  • Person Contour: select the main subject in the video frame through an AI-assisted algorithm. Works best with human subjects.
  • Object Tracker: select pixels by tracking one or more objects across the frame.
  • Face Detection: select pixels by detecting the location of human faces and tracking them across the frame for the duration of the clip.

Choosing Source Pixels

Original (left), selecting the darkest pixels (center) and lightest pixels (right)

Original (left), selecting the darkest pixels (center) and lightest pixels (right)

Mask

Parameters in this section define a shape used to crop the output of the effect with. When using an object tracker or face detection, the same mask shape is replicated for each object or face that appears in the frame.

  • Off: no cropping occurs.
  • Rectangle: crop the output to a rectangular shape.
  • Oval: crop the output to a circular shape.
  • Gradient: crop the output to a linear gradient.
  • Bar: crop the output to a two-sided gradient.
  • Custom: crop the output to a shape defined by a custom graphic.
  • Text: crop the outut to a shape defined by a title.

Choosing a Mask

Rectangular mask (left), gradient (center), gradient mixed with Person Contour (right)

Rectangular mask (left), gradient (center), gradient mixed with Person Contour (right)

Chromatic Aberration

Parameters in this section allow you to apply color distortions inspired by lens geometry, but with greater artistic range.

Using Chromatic Aberration

Original (left), distortion of the red and blue channels (center) and of chroma (right)

Original (left), distortion of the red and blue channels (center) and of chroma (right)

Channel Selection

This section allows you to limit the effect to specific channels, leaving others unmodified.

Limiting Output to Specific Channels

Animation

Build In/Out

Enable and control animation progress through a set of parameters.

When the animation is Off, no transition in or out of the effect occurs.

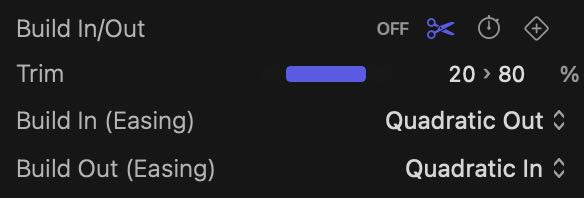
When the effect is set to build in and out by Trimming, the following parameters are displayed:

The Trim slider defines a range where the effect has been fully built. Any time outside this range is spent building the animation in or out. For example, if the Trim range is set between 20% and 80%, the effect builds in from the start of the clip up to 20% of its duration. The effects builds out from 80% to the end of the clip. If the clip were 5 seconds long, the build in and out animations last 1 second each.

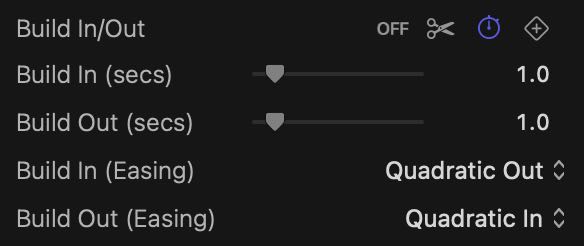
When the effect is set to build in and out through a Duration, the following parameters are displayed:

The Build In (secs) and Build Out (secs) give you an exact way to decide how long each animation should last. Should your selection not be applicable to the current clip, a warning will appear in the output. For example, if your clip lasts only 3 seconds, it would be impossible to have the build in and out animations both last 2 seconds each (as the total would be 4 seconds).

When the effect is set to build in and out through Keyframes, a single parameter is displayed:

The Build In (Easing) and Build Out (Easing) parameters let you choose the animation curve when animating by Trimming the clip or by specifying a Duration.

The Progress parameter gives complete control over the animation to you. You will need to keyframe the Progress parameter using features of the video app. Note that there are no easing options when manually animating via keyframes.

Size

Turn this parameter on to animate the Size parameter.

Size Animation

Angle

Off by default.

Angle Animation

Winding

The following options are available:

Range

Set to 100% by default.

Speed

Set to 10% by default.

Timing

The following options are available:

On

Set between 0.5s and 1s by default.

The slider lets you pick a range between 0s and 5s. Click the numeric controls to type a value in.

This parameter supports values up to +∞. Drag the right handle beyond the edge of the slider to pick values above the range represented by the slider.

Off

Set between 0.25s and 0.5s by default.

The slider lets you pick a range between 0s and 5s. Click the numeric controls to type a value in.

This parameter supports values up to +∞. Drag the right handle beyond the edge of the slider to pick values above the range represented by the slider.

Offset (secs)

Set to 0 by default. Only values between -10 and 10 are allowed.

Origin

Turn this parameter on to animate the Origin parameter.

Origin Animation

Aberration Amount

Turn this parameter on to animate the Amount value specified under the Chromatic Aberration section. A number of standard controls allow you to control the animation:

Aberration Amount Animation


Animating the Aberration Amount with Directional (left) and Radial (right) Fringing

Scale

Off by default.

Scale Animation

Behavior

The following options are available:

Range

Set to 25% by default.

Speed

Set to 25% by default.

Timing

The following options are available:

On

Set between 0.5s and 1s by default.

The slider lets you pick a range between 0s and 5s. Click the numeric controls to type a value in.

This parameter supports values up to +∞. Drag the right handle beyond the edge of the slider to pick values above the range represented by the slider.

Off

Set between 0.25s and 0.5s by default.

The slider lets you pick a range between 0s and 5s. Click the numeric controls to type a value in.

This parameter supports values up to +∞. Drag the right handle beyond the edge of the slider to pick values above the range represented by the slider.

Offset (secs)

Set to 0 by default. Only values between -10 and 10 are allowed.

Seed

A number that controls random aspects of the effect.

Click the New button to assign a new seed value. When the seed value is changed, the effect uses a different random sequence to produce a different output.

Motion Blur

Motion Blur

Enables motion blur at different quality settings. The higher the quality, the more samples are used. Multiple samples are blended together to produce a single frame of output.


Multiple samples are combined to produce a single output frame with motion blur

Shutter Angle and Offset

The Shutter Angle slider controls the size (aperture) of the shutter used to simulate motion blur. The size of the shutter determines how long light is allowed to pass through the lens. The angle is set to 180° by default. A shutter angle of 360° means that samples are collected for the entire duration of the frame.
Setting a value of zero means that you want the shutter to collect light only once, which is equivalent to turning motion blur off.

The Shutter Offset slider controls the moment in time when the shutter opens and closes, relative to the duration of the frame. The offset is set to 0 by default. An offset of zero means the shutter is perfectly centered over the moment in time when the frame occurs. The shutter is therefore open an equal amount of time before and after the current frame occurs.

The Shutter Angle and Shutter Offset parameters are only available when motion blur is enabled.